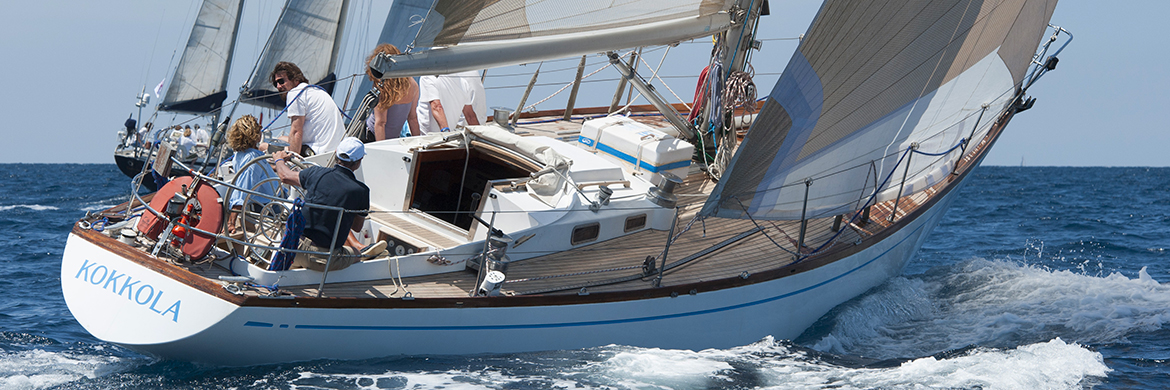
S&S Swan 43 maintenance resurce and discussion forum
Forward
Many of the 43s now are at least thirty (35) years old and still going strong, a testament to the sound engineering and construction standards and practices of the designer and builder.
However as the years pass, even these boats begin to require that extra TLC or the major overhaul or refit of systems. Over the course of each master's ownership, various maintenance, modifications and improvements have been incorporated into the 43s.
It is the request of this publication that each owner share with others a written descriptions (with pictures whenever possible) of the respective work performed and incorporated on their vessel for publication in this workbook.
Please submit all written materials on floppy disk using MS WORD format, include your Email address for listing in the submitted document. Submit articles to hnakajima@bpapc.com. Once received, I will try to format the document for posting onto this website.
Hiroshi Nakajima (43/046 Hiro Maru)
hnakajima@bpapc.com
General specification
Palmer Johnson / Swan 43
1967-1972
S&S des. #1973
67 hulls built
DimesionsLoa: 42.78 ft 13.04 m
Lwl: 31.00 ft 9.45 m
Beam: 11.65 ft 3.55 m
Draft: 7.2 ft 2.2 m
Ballast: 10400 lbs 4700 kg
Displacement: 22000 lbs 10220 kg (see note 1)
Antifouled area: 409 ft2 38 m2
On board systems Fuel: 39.6 gal(US) 150 l (see note 2)
Fresh water: 47.6gal (US) 180 l (see note 3)
Service battery: 12 v, 210 ah
Starting battery 12 v, 60 ah
Some boats Engine: Perkins 4-108 with Borg-Warner Hydraulic Gear
Box
Some boats Engine: Volvo Penta MD2B 18.4 kW (25 HP) with RB Mechanical
Gear Box 1.87:1 reduction gear.
Propeller: LH 17inch Folding Propeller
Rudder: Standard Bearing and Stuffing Box,Wheel Steering.
Trim Tab: Standard Bearing and Stuffing Box, Wheel Steering
Sail plan (see note 5)
Tall rig I: 51.54 ft 15.71 m
J: 17.54 ft 5.35 m
P: 46.04 ft 14.03 m
E: 16.2 ft 4.94 m
Fore triangle: 452 ft2 42 m2
Main: 372.9 ft2 34.6m2
Genoa 150%: 678 ft2 63 m2
Spinnaker: 1627 ft2 151 m2
Mast above water: 55.84 ft 17.01 m
Short rig I: 50.54 ft 15.24 m
J: 17.54 ft 5.35 m
P: 45.04 ft 13.81 m
E: 15.29 ft 5.2 m
Single Spreaders: Tubular Aluminum Standing Rigging: South Coast
Lenticular Rod Rigging with Threaded Ends (single uppers + or
double lowers) Wire with Norseman Terminals.
Interior layout:
2 Quarter Berths - Aft 2 Pilot Berths - Salon 2 Settee Berths
- Salon 2 Wooden Berths - Fo'c'sle 1 Head - Port side forward.
2 Hanging Locker - Starboard side forward. 3 Burner Stove - Galley
(see note 6) 1 Double Sink - Galley Ice Box - 7.7 cu.ft.(218ltr)
Galley 1 Nav Station - Port side aft
note 1: Actual final displacement may vary. (Boats with IOR Mk-IIIA
rating of 29.5' displaced 17,600 lbs. (8,000kg).
note 2: In one stainless steel tank below cockpit sole. Some boats
only have a 37 gallon tank.
note 3: In three stainless steel tanks below cabin sole.
note 5: Actual sail areas may vary, usually greater on boats with
racing sails.
note 6: Some fitted with 3 burner Luke "Heritage" pressurized
alcohol stove.
Rudder and trim tab
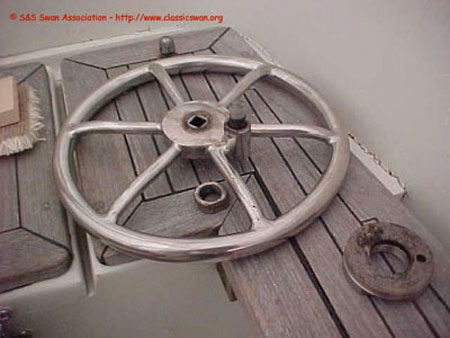
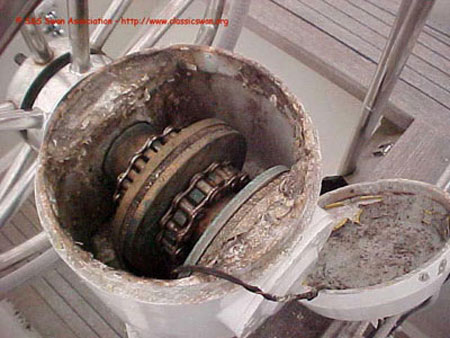
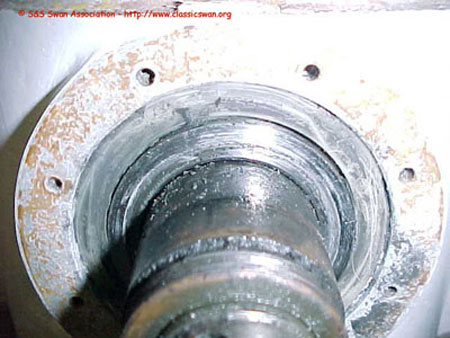
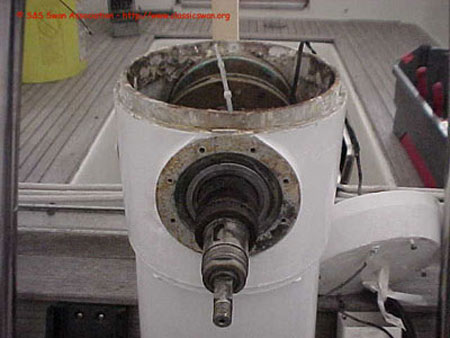
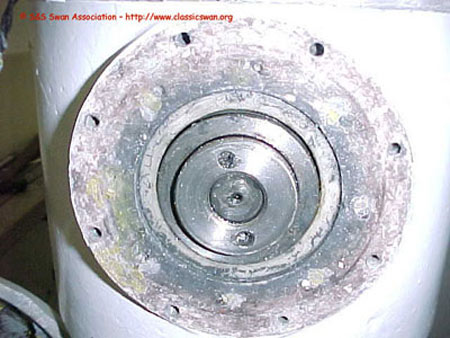
My Swan has the original rudder and trim-tab and the steering pedestal is original to the boat. Like many of you who have the active trim-tabs know the original cross-section drawing from Nautor (with notes in Finnish) is very diagrammatic and difficult to comprehend.
I had made numerous false starts over the years in my attempts to perform the overhaul work myself but become intimidated at the possibility that the steering shaft and it’s components could not be re-assembled to specs.
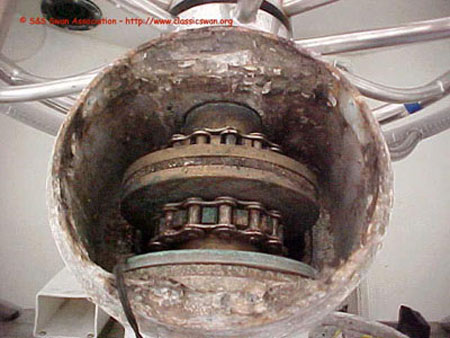
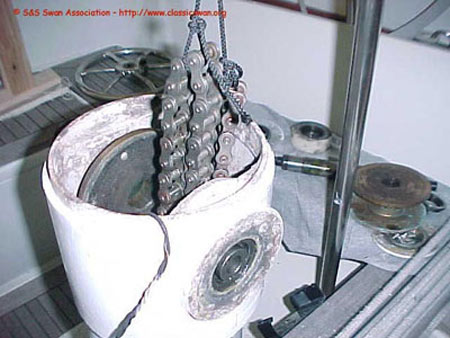
Based on the work performed by Jamestown Boat Yard I can say that the shaft assembly is actually quite simple and the work can be performed by the boat owner with average mechanical skills.I have attached photos from the overhaul work for information.
The shaft and associated gears appear to be reasonably robust and should not require any replacement, just a thorough cleaning.The only portion of the assembly that required replacement was the aft nylon bushing which supports the aft end of the shaft.This bushing on my boat developed uneven wear and had become slightly out-of-round creating rotational friction to the steering (see figure 4).
One tip when doing this work is to make sure to maintain tension to the steering cables and chain so they do not fall out of the sheaves inside the boat.You will see that the trim-tab cables have an especially circuitous routing inside the boat and bilge areas and I did not want to have to re-feed the cables through these sheeves (see figure 8).
Hiroshi Nakajima (43/046 Hiro Maru)
Rudder repair
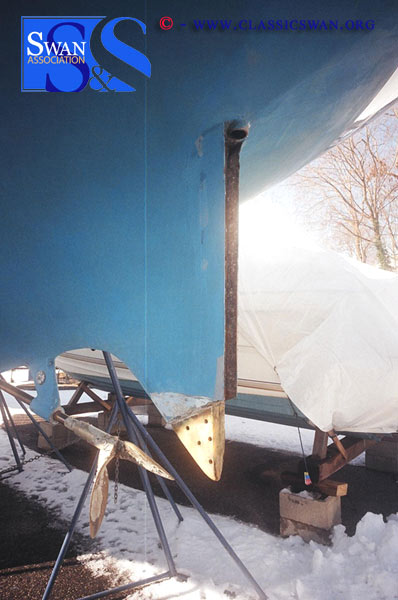
After discussions with Lars Strom, Technical Director at Swan the permanent fix was to weld the strap bushings to the rudder stock.
I performed the rudder repair work myself except for the welding component and can say that the repair is very straight forward and can be done in about 5-7 days time.
To properly weld the strap bushings to the rudder stock the entire rudder assembly should be removed from the boat.
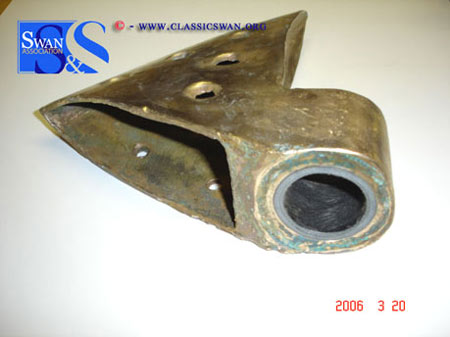
Removal of the rudder assembly goes quite quickly.First remove the rudder quadrant and loosen the rudder stuffing box.Next grind away the fiberglass fairing at the bottom tip of the skeg to expose the cast bronze shoe which supports the bottom of the rudder stock.
Remove the 4-5 bolts securing the bronze shoe to the fiberglass skeg.You may need to heat up this bronze shoe with a hand held torch to release any epoxy used to secure the bronze shoe to the skeg.Be very gentle here not to heat distort or hammer distort this shoe since this is a custom Swan casting and not overly robust.
Once the bronze shoe has been freed the entire rudder assembly should slip out.Have a helper here since my rudder assembly weighed about 90 pounds.
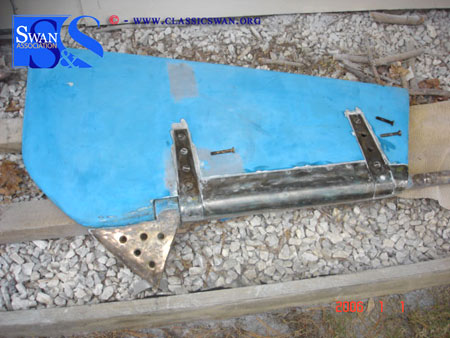
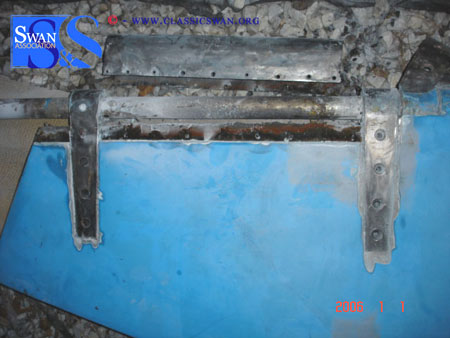
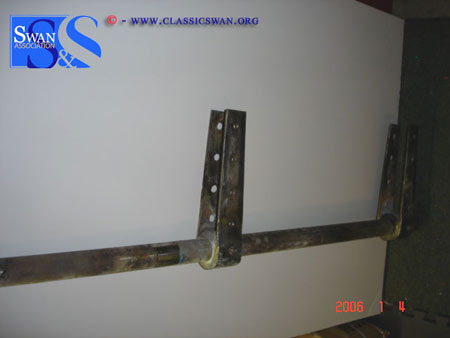
Once the rudder assembly is off the boat remove the stainless steel shrouds covering the stainless steel rudder stock along the leading edge of the rudder blade.Next grind away the fiberglass fairing to expose the stainless steel straps holding the fiberglass rudder blade.Removing the stainless steel bolts from the strapping should separate the fiberglass rudder blade from the strapping.
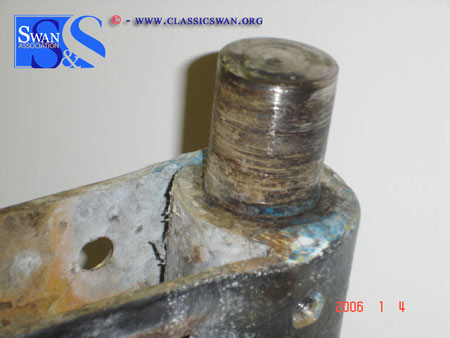
Clean the stainless steel rudder stock, strapping, etc with a wire brush wheel on a grinder.You will probably see numerous areas of crevice corrosion and pitting.The factory rudder stock is 40mm and I concluded that this is a very conservative design and unless I saw an obvious area of distress the shaft, although not pretty, was structurally OK for another 37 years.Also one should keep in mind that unlike contemporary spade rudder designs the older Swans have skeg hung rudders where the bottom of the rudder stock is supported by a bottom shoe and at the top so dynamic loads are supported at two locations.
I had my local rigging shop perform a TIG weld to continuously weld the top and bottom faces of both the upper and lower strap bushings.The welds were then ground smooth. Before you have the bushings welded double check their alignment and location with the rudder blade.I had to re-weld one of my bushings due to a slight mis-alignment.I was concerned about warpage of the rudder stock from the welding but did not detect any warping of the rudder stock.
Passivating would not hurt but I did not have enough time so I did not do this.
Re-assembly is reverse of dis-assembly.Make sure to replace all stainless steel bolts with new. Per Swan factory technical director’s direction all bolts should be torqued into place using a wrench on a double nut arrangement.Using a screw driver is totally inadequate.
I also replaced the bushing/bearing in the cast bronze shoe with a composite unit from this web-site http://www.garlockbearings.com.These bushings are pressed in to the casting. Again per Swan factory technical director’s comments do not use Teflon since this will expand when in contact with water and may cause binding and also not to use any graphite type material against stainless steel as this may promote crevice corrosion.
The time consuming component was the re-fairing of the rudder blade at the straps, shrouding of the rudder stock and the cast bronze shoe.Application of multiple coats, drying, sanding can take 3-4 days easily to achieve satisfactory results.
Deck
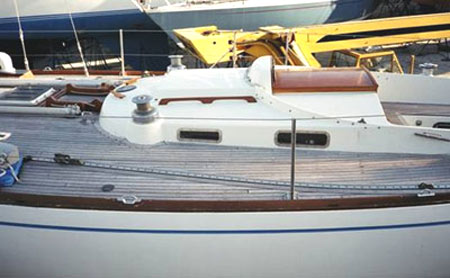
My original teak cleats on the top of the cabin abeam of the secondary winches finally succumbed to years of sun and water and ultimately split into two pieces. Not being able to find a suitable replacement cleat in wood or metal with the same foot print and placement I decided to make a set myself. Using the original wood cleats as a template I cut a set of new cleats using oak instead of the original teak. This allowed me to re-use the existing original bolt holes in the cabin top. Take care not to discard the existing bolts which secured the wood cleats as they are metric (8mm) and screw into an embedded and tapped plate sandwiched in the cabin top fiberglass. You should not have to remove the headliner down below to secure the new cleats. See photo below.
Hiroshi Nakajima (43/046 Hiro Maru)
hnakajima@bpapc.com
Running rigging
Rigid Boom Vang
I have found a very good source for a non-hydraulic mechanical rigid
boom vang for the Swan 43. Garhauer Marine out of Upland, California
will provide an all stainless steel boom vang with custom fabricated
boom and mast fittings (made for your boat) for approximately $350
U.S. (2000 price). The unit is beautifully fabricated with plenty
of spring action and comes with a 10 year unconditional guarantee!
This is a fraction of the price of a Hall or Forespar unit, which
are not even stainless steel, mast/boom fittings are extra and without
such a guarantee. The Garhauer boom vang model # RV20-1 comes with
all control lines; stainless steel blocks and mast/boom fittings.
When specifying the boom vang, contact Susan Felgenhauer at Garhauer
Marine () for specific dimensions and data required for your application.
This will typically be information such as the required full size
template of the mast and boom cross sectional profile; critical
dimensions of the boom and mast pivot points above the deck and
boom length. My boom vang arrived approximately 2 weeks after I
sent the data. Garhauer also makes all stainless steel blocks and
other fittings at very reasonable prices as well and they too come
with a 10 year unconditional guarantee!
Hiroshi Nakajima (43/046 Hiro Maru)
Solent or Baby Stay
My wife and I use Freya (043-08 or09?) primarily for cruising.
A roller furling jib is not well shaped when rolled up more than
a few turns. I wanted to be able to set a smaller jib closer and
lower to the center of effort but like you, did not want to have
to install running back stays. My solution was a masthead (really
15/16ths) staysail stay attached with a removable "T"
fitting and to use my second jib halyard brought down (about half
a meter) to below the "T" fitting with a fairlead. On
deck, I installed a double ring Wichard padeye backed up with
a large backing plate with a bale attached to a short 1x19 stay
and turnbuckle. The lower end is secured to the lowest point possible
of the anchor locker bulkhead with large bolts and a backing plate.
The deck fitting is located to be directly in line between the
"T" fitting near the mast head and the attachment to
the anchor locker bulkhead (about 20 inches forward of the forepeak
hatch). The staysail stay is vectran line with an eye splice and
thimble at the lower end. Instead of the Wichard type removable
stay adjustors, I chose to use a traditional lashing that is ultimately
tensioned with the backstay. When not is use, it is tied to a
deck padeye just forward of the mast. I had to put over sized
hanks of my staysail in order to hoist it up the vectran stay.
The system is not perfect but works for my use.
Charlie Hancock (43/008~009 Freya)
All Rope Halyards
I replaced all of the halyards (wire to rope type) with all rope
halyards in 1999. This reduced the weight of the halyards significantly,
especially aloft. They are much easier on the hands, as well as
the sheaves in the mast and to the halyard winch drums. This is
a relatively easy modification. The only precaution that must
be taken is to check all of the halyard sheaves and sheave boxes
at the top of the mast to make sure they are appropriate for rope
halyards. Many sheaves are designed for wire halyard only or combination
wire/rope halyard. The wire halyard only sheaves will probably
not have the correct sheave dimensions for a rope halyard. Also
the sheaves tend to get damaged or nicked by the wire halyard
and these may damage or cut your new rope halyards. Also do not
forget to inspect the sheave boxes, since these maybe too small
or narrow to accommodate the new rope halyard sheaves you were
thinking of installing. One of my sheave box had to be enlarged
to accommodate a new rope halyard.
Hiroshi Nakajima (43/046 Hiro Maru)
Dutchman Main Sail Flaking System
Probably one of the single best improvements made to the boat
was the installation of a Dutchman main sail flaking system in
1999. The main can now be hoisted and doused by one person and
is ideal for single handed sailing. The near self-flaking design
of the system allows the main sail to be doused on top of the
boom without it falling all over the deck. The whole dousing operation
and flaking of the sail on the boom can be achieved single handedly
in under 2 minutes. The Dutchman system works like a venetian
blind window curtain system in that the main sail runs up and
down on 3 thin vertical lines led off of a topping lift. One of
the best features of this system is it’s minimal impact to
the main (in terms of windage aloft affecting air flow and number
of holes in the sail). It eliminates all of the control lines
typically associated with a "Lazy Jack" system. The
system is best fabricated along with main sail customization by
your sailmaker. Installation on to one’s boat is straight
forward and can be done by the boat owner. One improvement to
the standard Dutchman system that I would recommend is the use
of small diameter high tech lines for the vertical guide lines
in lieu of the Dutchman’s oversized mono filament type line.
By using the high tech line it can be simply spliced into the
topping lift for a neat and simple solution. The Dutchman’s
standard detail for this is a clunky metal splice fitting which
holds the vertical mono filament guide lines to the topping lift.
Approximate cost of sail modification is $1,000 U.S. (1999 price).
Hiroshi Nakajima (43/046 Hiro Maru)
Standing rigging
9.Standing Rigging - Spreader Crack
During a routine rigging inspection my local rigger found a small
radial crack at the spreader tip.The spreader is the original tubular
aluminum design with a forked tip welded to the end of the tubular
spreader section.
The small hairline crack was found at the weld where the spreader
tip is attached to the tubular spreader. The rigger was able to
repair this crack by carefully removing a portion of the faulty
weld and re-welding this area again.
This crack was so small it would be easily missed unless one were
looking for this particular item.I would recommend that every boat
owner do a careful inspection of every component of their standing
rigging at least once every year and have a professional rigger
do one every second year.The rigger who noticed this crack on my
spreader is the same rigger who had completed a major overhaul of
my mast four years ago and was knowledgeable enough to know what
to look for specifically in older rigging.
A crack of this nature in the spreader tip can result in catastrophic
failure of the rig and I urge all of you to be vigilant.
Hiroshi Nakajima"Hiro Maru"43/46
9.Hardware - Gear Winch Refurbishment
When I purchased my boat one of the things I noticed was how original
it was in many ways.This included the winches which were vintage
Barlows.
In order to improve the short handed sailing capabilities of the
boat I was interested in replacing the primary winches with a
self-tailing type.
I searched for quite awhile for a suitable replacement but was
not satisfied with what was available.New winches invariably had
different base diameters than the Barlows and would require modifying
the existing stainless steel pedestals.Also I felt that the newer
winches just did not fit my boat’s vintage design.
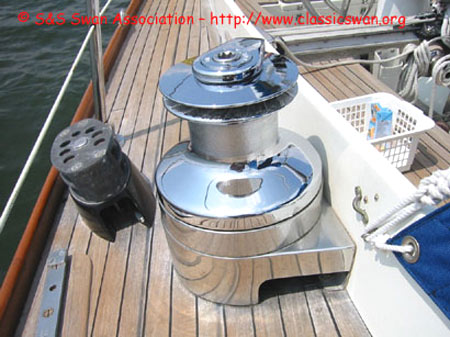
I finally did however come across The Australian Yacht Winch PTY,
Ltdwww.arco-winches.comwho took my existing non-self-tailing Barlow
28 winches and converted them to self-tailing unit.They also increased
the gearing to a 32 and re-chromed the winches at the same time.
They have been on my boat now for 4 years and have been just great.They
fit the vintage of the boat and best of all required no modifications
to the winch pedestal or cleat locations etc.
m I have included a picture of the converted winch.This was a
very worthwhile winter project.
Electronics
Auto-Pilot System
After having surveyed a number of auto-pilot installations and system
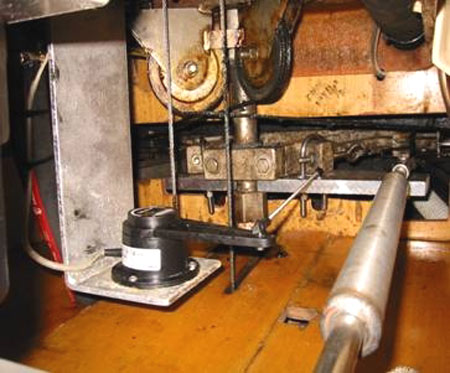
designs I elected to purchase a quadrant mounted auto-pilot system.
The steering system back-up feature of a quadrant mounted auto-pilot
design provides a level of comfort for the owner in the event of
steering cable failure. This type of system does however require
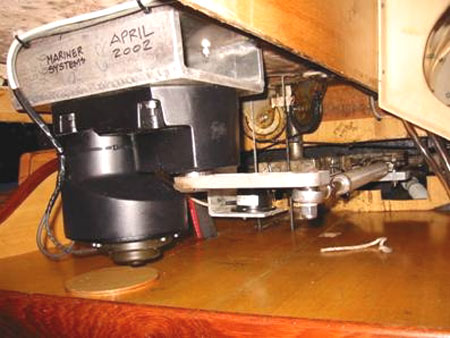
careful planning and installation. On my boat I decided to install
a Whitlock Direct Drive electric motor controlled by a Robertson
AP21 brain. This is a system design that Robertson and Whitlock
will warrant as a package. My concern was and still is to keep all
of my boat systems extremely simple and rugged. In order to have
a dependable auto-pilot system in the harshest of marine environments
I wanted a robust system with minimal components. The Whitlock Direct
Drive electric motor connects via a stainless steel tie-rod directly
to my steering quadrant. This system design eliminates the need
for any hydraulic systems to move the rudder. Many auto-pilot systems
rely on a hydraulic ram to move the steering quadrant. The hydraulic
fluid which moves this ram is moved via a hydraulic pump powered
by an electric motor. In my opinion there were too many components
to maintain and potentially fail. Hydraulics are good but the internal
seals eventually require maintenance, hydraulic fluid hoses may
leak, hydraulic fluid needs periodic replacement, the hydraulic
pump and electric motor also require maintenance. In my opinion
too many components. The Whitlock Direct Drive electric motor, using
reduction gears is very strong and comes in a neat package. This
motor is controlled by a Robertson AP21 brain. The AP21 controller
comes on a long cable so that I can move about on deck while still
controlling the auto-pilot.
Hiroshi Nakajima (43/046 Hiro Maru)
Engine
High Lift Water Jacketed Muffler (Replacement)
My Perkins 4-108 diesel engine was equipped with a custom stainless
steel water jacketed muffler. Since the engine was rebuilt by the
previous owner approximately in the late 1980s this muffler was
probably installed at that time. The muffler is connected to the
jacketed exhaust manifold on the port side of the engine. (Depending
on the Perkins engine installed it is possible that the exhaust
manifold can be either port or starboard.) Working ones way aft
from the aft end of the exhaust manifold the connection is a hard
(non-flexible) connection via a short horizontal (6") section
of stainless steel pipe and then turns upward via a water jacketed
st. stl. exhaust canister that places the top of the canister up
under the bridge deck keeping the system above the relative waterline.
The exhaust gases and cooling water would travel up the exhaust
pipe and enter into the canister from the top. The gases and cooling
water would then fall to the bottom of the canister and discharge
into a flexible rubber exhaust hose out to the underside of the
transom counter. This canister appears to be of sufficient volume
to minimize any backflow into the engine from following seas. After
my purchase of the boat in 1998, the bottom of the canister began
exhibiting pin hole sized water leaks, which I was able to temporarily
seal by removing the muffler and having the leaks welded by the
local rigging shop. Then in late summer of 2000 more leaks developed
in which so much water leaked that it filled the bilges with water
to the floor boards. After removing the stainless steel muffler
once again for the third time in two years the diagnosis was that
although the muffler was in good condition the areas around the
original welds, particularly where water would sit in between engine
usage, had begun to corrode so badly from the inside that repair
welds were no longer an option. The outside of the muffler looked
very good. Since the muffler and the available space for the muffler
was very particular to the boat rather than re-engineer a new system
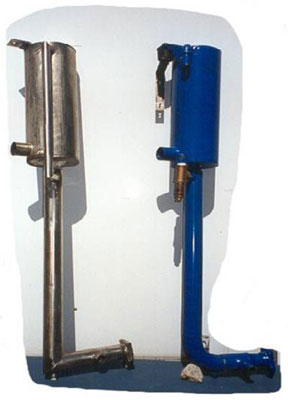
(with unknown results) I opted to have a duplicate unit fabricated
by a marine muffler fabricator located in Long Island, NY. I delivered
my old st. stl. muffler to him and he custom fabricated a new unit
using a cuprous-nickel alloy. I went to re-install the new unit
on my boat and to my great relief the new unit fit perfectly without
any modifications to any component. The new muffler unit also incorporated
some new features such as screw-in pencil zincs to reduce any galvanic
action. The replacement muffler unit cost approximately $700 (2001
price) and took approximately 2 weeks to fabricate. I performed
the installation and it required approximately 1.5 hours using simple
tools. The name of the muffler fabricator is: Marine Manifold Corp.
134 Verdi Street East Farmingdale, NY 11735 631-694-0714 Mr. Paul
LoBrutto Old stainless steel muffler on left, new replacement cuprous
nickel muffler on right.
Hiroshi Nakajima (43/046 Hiro Maru)
Miscellaneous
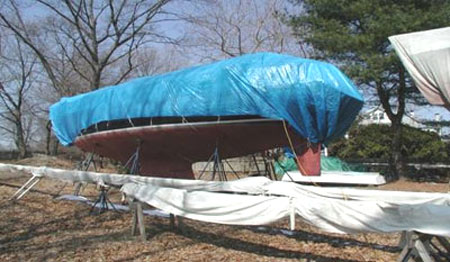
Simple winter cover (with mast out)
The following reusable system has worked well in most windy and
snowy conditions and can be stored relatively easily. The cost is
mostly the reusable covering material. White canvas is my favorite
at about 30 cents a square foot for a rectangular cover with grommets,
about $250. This system also clears the deck of spars and the lifelines
can be kept in place. The key weight bearing parts that are made
up in advance are: A seven foot wooden 4X4 false "mast"
to stick down to the mast step. A short three foot 3x3 "post"
to stick in the bow deck plate A "X" frame set on top
of the mainsail traveler track. The height can be customized. One
spinnaker pole clips from the "mast" to the bow "post".
The second spinnaker pole (or boom) clips from the "mast"
to the top of the x frame. The spars clip to round eyebolts screwed
into fore or aft sides of the wooden "mast"," post"
and X frame. Then, ¾ inch PVC pipe then bent over the spars
and attached to the top of each lifeline stanchion. I also run a
PVC pipe tied to the end of the boom to the pushpin to help shed
snow. Use split water pipe isolation and duct tape as chafing gear.
I have drilled holes in the end of the PVC pipes to accept large
wire ties around the lifelines for added security. Go forth armed
with extra rug material and duct tape as needed.
Roger Merrill (43/051 Deneb)
