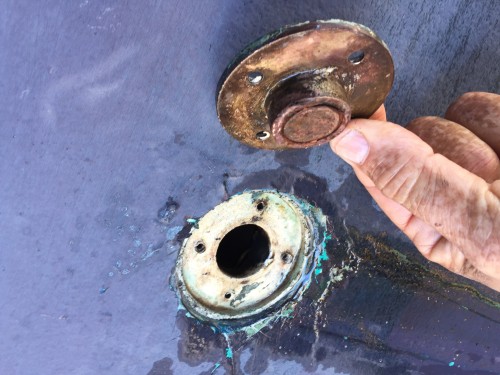
Chocking discovery: a plug instead of a daiveka Chocking discovery: a plug instead of a daiveka
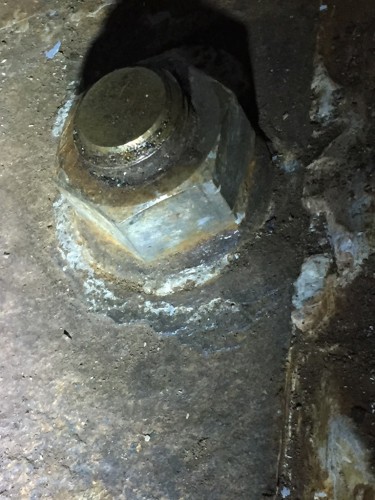
Farouche is now on the hard for the winter. One maintenance item on my list of to do things is to thoroughly clean the bilge. So I thought of opening the daiveka on the starboard side of the keel. My jaws dropped to my knees when I realised that what I was expected to be a proper daiveka, turns out to be an ordinary plug. My astonishment, surprise and chock when even higher when I realised that this dreadful plug is �secured� by 4 small ordinary screws only! A proper daiveka does have thread and is secured in the receiving part, which in turn is cast in the keel.
Nothing at all of this. Just a dreadful plug!
Please do judge for yourself examining the attached pics and tell me what you think: is this normal? If not, what to do?
Philippe
I ignore what a "daiveka" is but I know what is that "terrifying" thing; it is a bilge drain plug and it is one of the things that made me appreciate the Swans with respect to my previous boats - beside a lot of other things, of course!
Extremely helpful to keep the inside of the boat dry when on hard.
I understand your feelings because also my wife was very shocked to find that hole in the hull and this is why, every spring after closing the plug and before launching the boat, I put a layer of epoxy putty over the assembly to make it flush, non visible and, maybe, more safe. That makes slightly harder its finding it again the next fall, but I believe it is a fair compromise!
Daniel, 411/004
A daiveka is a large and scure "plug" in bronze with thread. I am not sure if it is the right term in english. the scandinavians say "dyveka". Anyway, covering the plug with epoxy or else is feasible but not the best option. I am just surprised and quite disapointed that Nautor used such a PRIMITIVE method and cheap way that can actually sink you!
I wonder if Lars has some thouths about this issue?
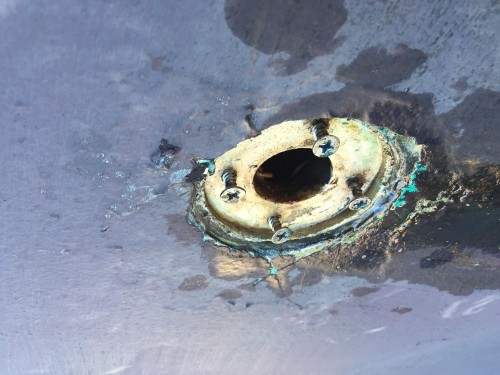
We replaced the bilge drain plug two years ago -- the model we got from Nautor is a successor to the one that was already installed when we bought the boat. As Philippe states, it is a wide circular ring-shaped fitting that is simply screwed onto the hull, going into a small recess (in our case, epoxy-glued and screwed). The actual plug is the threaded part you see in the middle, which sits inside the fitting. As Age spends her winters on the dry, removing the plug and cleaning the bilges is part of her yearly program.
I have actually never wondered whether the complete structure is safe. In the first year before we replaced the plug, I was worried about the worn threads of the plug, not knowing how the fitting looked, but was pretty sure that the position of the plug with a considerable water pressure from outside would help to keep it in place. Never did I wonder what if the complete fitting comes off ... but Philippe is right. That could sink you.
The only ad-hoc explanation I have is that the position of the plug outlet in the bilge, right off the bilge bottom, would make it incredibly difficult to put a counterpart to the fitting in place. The result would probably be an outlet that is a couple of inches off the bottom, leaving as much water inside. But still: that could have been solved.
Philippe, thanks.
Martin
Dear Philippe
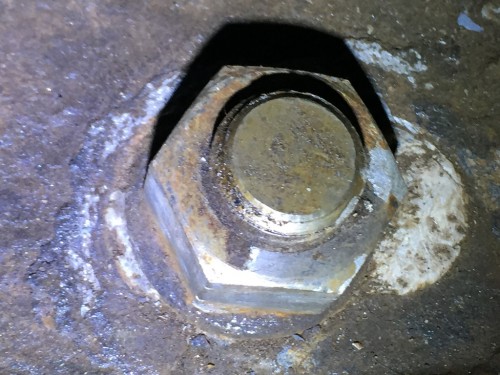
This is a proper dran plug (dyvika in Swedish) and there is a threaded plug in the center.
Not aware of any problems with these, there are no forces except the outside pressure. Many owners do not even know that the plugs exist.
The plug has an O-ring seal at the neck, check that it is in good condition.
The flange was bedded down into mastic, and should be difficult to remove. Epoxy could well be used as Martin suggests.
The screws are there for holding the fitting while the mastic cures, and providing additional safety. If there are properly pre-drilled holes for these screws they can not be pulled out but will break instead.
You may put in longer screws for the upper ones, with nuts on the inside if you feel additional safety is needed.
Kind regards
Lars
Thanks a lot for your kind and knowledgeable comments.
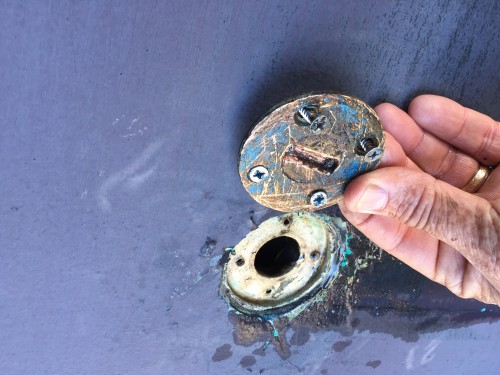
Lars, I also was expected this to be a proper drain with threaded plug in the center. However, It was impossible to unscrew the center. Instead, I went for the 4 screws on the fitting which then came out very easily. So, The flange was NOT difficult to remove. I understand now: the week point was the fitting/flange of the drain threaded plug at the center. The latter was impossible to move.
So, you say that I will have to unscrew the centre of this "dyvika"- feasible now that I have the whole thing out - change the O ring and then cast the fitting/flange with epoxy -possibly?- holding it with the four screws. I guess that the critical issue here is that this flange can be properly secured in place. Putting longer screws with nuts from the inside is a rather impossible task unless one has the arms of an octopus. So, I will rely on an epoxy mixture of some sort.
Any suggestions on "how to" with thanks.
Lars, May I ask another question?
As it were, I am about to embark in adding washers under the nuts of the keel bolts. These will be in contact with the existing mast shoe - which is in galvanised iron. Should the washer be in iron or in stainless steel or other? Please advise.
I also think that the possibility of the outer part of the plug assembly getting loose and sinking the boat is very unlikely. The four screws plus a good caulking/gluing will suffice to make it well fixed and safe.
Conversely, as soon as I discovered the plug I did replace it with one provided with two cylindrical holes on the outer surface because I did not like the slot. Now I use a "pin face spanner" for screwing/unscrewing it and the two small holes hardly get worn like the previous slot.
In order to be sure that the plug will not be stuck by the epoxy, I use Teflon tape to protect the screw and fill the small driving holes; at next haul-out, without much work the spanner does fit again and the plug is unscrewed.
Daniel, 411/004
Dear Philippe
Thank you for the information.
Probably the threaded plug has been tightened too hard, and the entire assembly has then been removed when opening was needed. The Phillips head screws may also be more recent, I would suggest slotted screw heads were originally used.
If the plug can not be opened maybe Daniel could provide a tip where a new one with two holes instead of a slot can be obtained.
It would be important to ensure that the material is corrosion resistant, same requirements apply as for metal seacocks - bronze is the best, but how to know for sure, as brass looks the same.
If you use epoxy all the old mastic should be cleaned away right down to bare GRP, and to bright metal for the plug. If you suspect that the old mastic may be silicon it would be advisable to check that the epoxy really bites onto the GRP and metal before the final gluing is done. (Silicon is a nuisance, as nothing sticks to surfaces contaminated with it. Do not use Johnson's Pled in the interior, varnishing will not work any more).
Put in tiny spacers behind the plug flange, so the epoxy thickness will be at least 2 mm all around after you lightly tighten the screws.
For the added keel bolt washers I would suggest a sacrificial material is used, this protects the mast step from corrosion. Its removal is a major task, while the washers can be replaced when required. There is a manufacturer in Scandinavia making aluminium anodes which are more effective and last longer than zinc ones in both fresh and salt water, see http://www.zinaltec.com/
You would need a flat sheet of this anode material, probably not available, but an ordinary anode could be sliced into pieces.
Kind regards
Lars
Thank you very much for the information and precisions.
It is right that the screw head of the plug is a slotted one and it is quite worn out, which explains the difficulty of opening. I will try to "grind" the slott in order for a tool to get a grip. If not a replacement will be required. And of course, bronze is the material of choice.Thank you for the "how to do" with the epoxy.
Added keel bolt washers: Thank you for the te contact for the Scandinavian manufacturer. There is something that I do not understand since I was asking about the choice of the material of the washers. In what material should they preferably be? The flat sheet of the anode material, or anodes sliced into pieces are to be attached to the mast step to protect it from corrosion.OK.
But my question remains: In what material should the washers be?
Dear Philippe
A further recommendation is to use West G-flex, and roughen the bronze with Scotch Brite, see supplier's website.
If you make the washers out of the anode material they will be in good contact with the mast step provided the steel under the anode is cleaned. If you prefer to use stainless washers and separate anodes these have to be bolted to the mast step for making contact.
Kind regards
Lars
Dear Lars,
Thank you for the precision and for the West G-flex suggestion. Will do. So, I will go for the stainless steel washers and have anodes bolted into the mast step. The reason why I prefer to have stainless steel washer is that the work of adding them is so considerable that I want to avoid the need of replacing them for years to come, as I would have needed to do with sacrificial washers. I believe that I can bolt big and efficient anodes on the mas step making sure that the contact is excellent.
I will take pics of the process. In the meanwhile, many thanks indeed.
Dear Philippe
You could also use movable anodes easily immersed into shallow bilge water areas if you connect them with a cable to the mast step
Kind regards
Lars
Dear Lars
Thank you again. I will do just that in addition to the one bolted into the mast step. Zinaltec is dispatching aluminium anodes to me right now. Will take pics for the forum.
Kind regards// Philippe
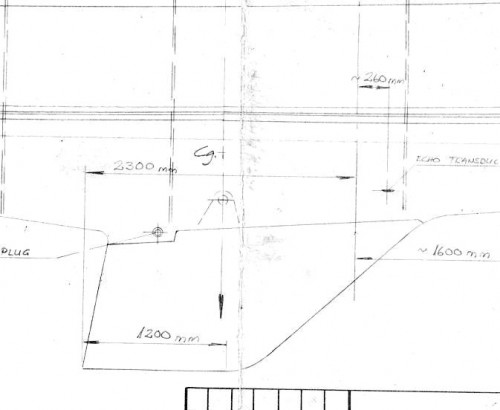
I was not aware that this drain plug existed. Could you please indicate the location on the 41, and I will try and find it. Is it actually in the keel, as the keel is completely sheathed on my boat?
Please find enclosed a part of the original drawing by Nautor labelled "Docking Plan" which displays the placement of the drain plug in the 411.
I am sorry but I have no information on other boat models.
Daniel, 411/004
Dear Cosmo Little
The plug is on SB side at the deepest point of the bilge, just above the top of lead line.
You should be able to find the recess inside, giving you a clue where to look on the outside.
Kind regards
Lars
As you now I am embarking in the process of adding washers under the nuts of the keel bolts. This, because I can see that the mast step is corroded in some places, to some extend only and especially around the areas surrounding the keel bolts. Here is what I have done so far and my further questioning:
- I am in the process of cleaning the mast step, removing all the rust and exposing the bolts and nuts.
- What I can observe right away is that the corrosion of the mast step is �minimal� of about 2-3 mm at some places at the most.
- There seem to be, or should I say there are, washers already under each nut. I thought there were no washers.
- The holes in the mast step though with the keel bolts emerge are oval. As the pic shows, the washers cover only a part of the holes. The rest of the holes are filled with some sort of mastic or other.
- I understand that the reason fort these holes to be oval is the adjustability of the mast step. But why does the washer not cover the entire hole? There is maybe a reason, but I d not understand it.
My worries:
The yard people and myself have tried to move the nuts and find it �impossible� without the use of a brute force. We do not want to apply any brute force. I have been told that there is a risk of inducing movements of the bolts if applying a too strong force on the nuts. If such becomes the case, then I have a very serious problem. The yard people recommend that I drop the project �adding washers� altogether and that I do not touch the nuts. They all say that it is good enough as it is.
Now I am asking you please look at the pic and tell me what you think. If you need more indications or pics, please tell me which/what.
Thank you all in advance
Of course I am expecting the wise advice of someone else on the particular problem but I like to pinpoint the fact that undoing a frozen nut does not need to be performed by brute force. There is a special tool for the purpose that cuts it and opens it like a book: very clean job and no brute force whatsoever.
Of course you then need a new nut!
Daniel, 411/004
Dear Philippe
The recommendation is to use bigger and thicker washers. Now they bear only on the edges of the oval slot, and this may be part of the problem with opening the nuts.
Provided a torque wrench is available it could be tried to apply the torque used for tensioning them originally, but now instead for opening them.
For M24 it is 260 Nm, for M30 510 Nm, if this does not open them the recommendation is to use a nut splitting tool as suggested by Daniel.
Kind regards
Lars
Dear Lars and dear Daniel
First thank you very much for the advises. Although what you say is helpful, there are alas constrains that limit the options: Daniel, there is no space for "inserting" the special tool cutting the nuts. Furthermore, I do not know what "a frozen nut is". The space is cramped and one can hardly put one hand. The nuts are reachable only through the hole on top of them through the upper part of the mast step. Thus, the cutting tool must, alas,be ruled out.
I am left with the sole option of undoing the nuts using tools such as a torque wrench with a vertical extension. That I can do, I think. Now, in order for me to do/have done this with the peace of mind that the bolts would not move in the process, I have one ultimate question for Lars - a question which might seem quite uninformed to you, but I take that risk because, I admit it, I am not specially informed in matter of bolts and nuts:
? Are the bolts casted in the keel in a way that they cannot move around? In other words, is it safe and possible to force the nuts out without moving the bolts?
Thank you in advance for your comments and suggestions