Do you want to be informed on new Posts on this Thread? (members only)
| S&S Swan Maintenance - Merriman car tracks |
|---|
|
Join Date: 17 November 2009
Posts: 43 |
||
|---|---|---|
|
Merriman car tracks
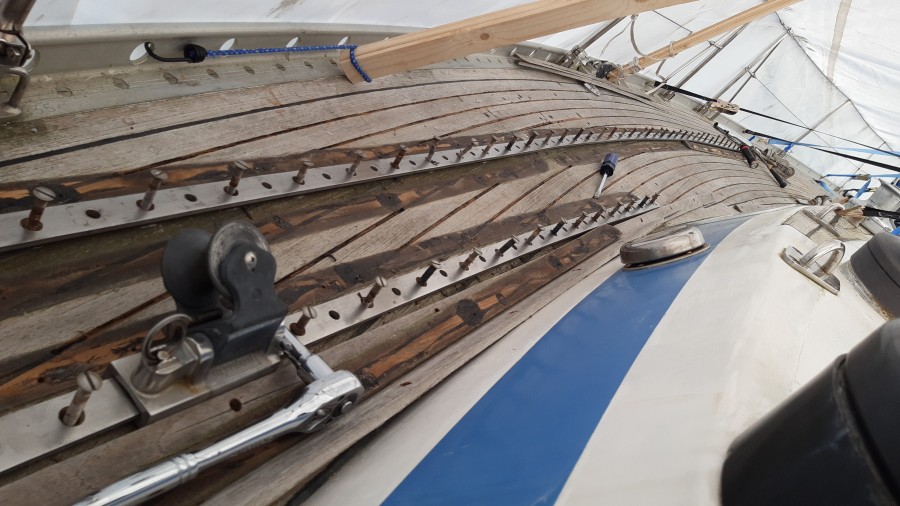
Hello all, hoping to gain from the group's knowledge/experience. Can anyone describe how to remove the Merriman car tracks? Swan 431, 1978. The deck wood underneath them needs care/attention. I can see the backing system is embedded in the GRP under the deck, I can see the slots of the many "screws" are all oriented parallel to the long axis of the track, I can see when I turn some of these screws, there seems to be no systematic tigntening or loosening ( as a threaded system would respond). What I don't see is how to make any headway in removing the track. Insights? |
|
Join Date: 17 November 2009
Posts: 43 |
||
|---|---|---|
|
Photo of car and track of which many I hope to remove so I can access seams underneath.  Upside-down photo |
|
Join Date: 05 August 2010
Posts: 164 |
||
|---|---|---|
|
Hi C.Kendall, you are on the right track. I did the same job on our 48. The screwheads that are so beautifully aligned are actually the head of 8-mm-bolts. The bolts lead down below deck, where the washers and nuts are glassed in. There should be no need to open the nuts from under deck, it will likely be possible to unscrew the bolts from above. There is a tufnol rail between the deck and the genoa rail that works as a spacer. What I think the construction steps were: the bolts were tightened, then cut just below their respective nut. Then the nut was glassed in. As a result, the length of the bolts varies depending on local deck thickness, so I suggest keeping them in strict order if you plan to reuse. I found in many places of the boat that the nuts can simply be reused after cleaning the holes with toothpick-strength wire or a very small brush and pressured air. Only if you find traces of corrosion on the bolts you should access the nut. You can of course remove all the covers from the nuts below deck (like I did on my first job) but that will be detrimental to the wonderful handiwork of the Yard. Feel free to contact me with further questions ... best regards, |
|
Join Date: 17 November 2009
Posts: 43 |
||
|---|---|---|
|
Hello Martin, Very much, thank you! Now I am able to get those screws to come out (and there are many to go). As you said there is this old gunk/grease/dirt that builds up on the threads and it takes some effort to get them to continue to release after they separate from the bolts that are fiber-glasssed in. I really appreciate your guidance, earlier, I could not conceive physically what was happening as I turned the gunked up screws and seemingly getting no removal action at all. I think these screws have been aging their grease and collecting dirt for 46 years and am astonished at their good shape after cleaning them up. Thinking ahead, after my deck work, do you have an idea of what kind of grease I should put on thread when I put things back together? With highest regards,
Kendall
 After following your directions.. |
|
Join Date: 29 January 2007
Posts: 1033 |
||
|---|---|---|
|
Dear Kendall, |
|
Join Date: 27 February 2007
Posts: 35 |
||
|---|---|---|
|
Kendall, I am in the middle of removing the teak deck and genoa track on my Swan 38 (similar track system). I originally hoped to remove the M8 bolts without having to unearth the glassed in nuts and washers. However, I found that in some situations, I could not free the bolts... but also I realized that some of that debris/gunk on the bolts would also be in the nut at the bottom, and likely make refastening difficult if trying to reuse (can't clean the nut threads that are encased). Plus, in my situation without the teak deck the bolts will be too long... so I went with removing the nuts from below. My situation is a bit different because I am also removing the teak decks and then plan on rebedding. For removing stubborn bolts I found it helpful to pass the tip of a butane torch over the heads which helps to free them up a bit. That helped me with several stubborn ones. The other tip was to use a manual impact driver set (by hand, with hammer). This combo freed up many stubborn bolts. Once you get a quarter turn - you know you are headed in the right direction. Removing the nuts and washers makes it even easier to remove the bolts - but it is a tedious task (removing all the headliner and getting access to the ones that are in tougher to reach spots). Using an oscillating tool to cut the fiberglass reduces the amount of fiberglass being thrown and then you can simply pop off the "dimple". Some tough to reach areas in lockers I had to use a hand chisel and hammer. Maybe more/less easy on the your boat. This approach would obviously require more work to prep for new nuts/washers (that's the technique I'll be doing on my boat). If you can get the glassed in nuts to still accept/tighten the bolts without this process, you will save a lot of time I imagine. Please let us know how it goes putting it back together so we can learn from your experience. Thanks.
-Nathan sv/Inspiration (Swan 38/090)
|
|
Join Date: 29 January 2007
Posts: 1033 |
||
|---|---|---|
|
Dear Nathan, |
|
Join Date: 17 November 2009
Posts: 43 |
||
|---|---|---|
 |
|
Join Date: 17 November 2009
Posts: 43 |
||
|---|---|---|
|
Martin, Nathan, I've persevered on port side so far. See image above. I'm 5 weeks into process. With kneepads I can go for about 3.5 hours per day. I've kept the order of the bolts by lining them in sequence on two straps of duct tape. (Not shown) I've filled the holes temporarily with wooden dowels to keep sawdust out and nuts clean. Removing all black caulking on port side, finished. Light sanding started. I assess the deck is servicable. Port is my most problemed side. Thickness varies as a function of where foot traffic has been heaviest. Near port gate thinnest, 5mm. Areas covered by rails, and nearer stern, 10mm. Elsewhere mostly 7 or so. Where thinnest, reducing rabbet thickness to accomplish seam depth to approx equal seam width. Sometimes reducing rabbet thickness to 0. Lars suggested this option.in an earlier thread. Will use TDS caulking. My earlier prob with bolts.. First three I tried, nuts rotated and wouldn't release bolt. After piecing together a tool which included ratchet handle, all but one bolt were able to be removed. This is my first summer after starting retirement. I've found the work enjoyable and it is rewarding to see daily progress. There is a saying in US, "its not your car until you turn half the bolts" After having Andiamo for seventeen years, and after this deck work, it's starting to feel like she is mine. Thank all for guidance on this. Kendall |
- Threads : 1715
- Posts : 10273
- Members: 823
- Online Members: 0