Do you want to be informed on new Posts on this Thread? (members only)
| Keel Bolts and General Topics on Keel - Stainless Steel trailing edge to keel |
|---|
|
Join Date: 01 February 2007
Posts: 234 |
||
|---|---|---|
|
Stainless Steel trailing edge to keel Can anybody tell me how the S/S trailing edge to the keel is attached to my 411? It has started to pit and I am not sure why, or if it needs replacing. John |
|
Join Date: 30 January 2007
Posts: 461 |
||
|---|---|---|
|
Hi John, |
|
Join Date: 01 February 2007
Posts: 234 |
||
|---|---|---|
  |
|
Join Date: 30 January 2007
Posts: 461 |
||
|---|---|---|
|
John, |
|
Join Date: 02 January 2008
Posts: 1547 |
||
|---|---|---|
|
John and Daniel The trailing edge consists of thin strips of stainless each side attached to the lead with short pieces of rod welded to their back side. The strips and rods are cast in. There is also a thicker stainless docking shoe along the underside. Lars |
|
Join Date: 01 February 2007
Posts: 234 |
||
|---|---|---|
|
Lars, last year when we had the copper coat put on I made the decision to remove the filler from the stainless as it was constantly falling off. Every year we would need to re work the trailing edge. By exposing the S/S has this created a problem in terms of electrolosis? The S/S is antifouled.
|
|
Join Date: 02 January 2008
Posts: 1547 |
||
|---|---|---|
|
John Normally stainless should not corrode, sounds like something in the antifouling, sea water, or an electrical leak could cause this. In order to get epoxy paint and filler to stick to stainless the following trick is suggested: Sand the surface with wet and dry sandpaper using the epoxy as wetting agent, preventing air from reaching the surface during sanding. Kind regards Lars |
|
Join Date: 01 February 2007
Posts: 234 |
||
|---|---|---|
|
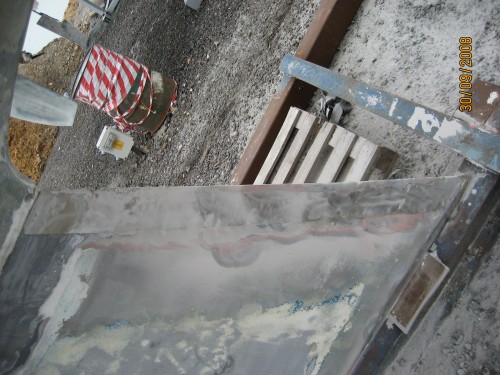
All, I recently meet with a marine surveyor who diagnosed Galvanic Crevice Corrosion. Galvanic series in seawater Noble or cathodic end Stainless steel type 316 (2% molybdenum) Stainless steel type 304 Stainless steel type 312 (0.4% molybdenum) Monel Gunmetal Phosphor bronze Admiralty brass Red brass Copper Naval brass Manganese bronze Muntz metal Lead Stainless steels with oxide destroyed Cast iron Mild steel Aluminium alloys Cadmium plating Galvanised steel Zinc Magnesium Base or anodic end Stainless steel appears in two positions in the table, which is confusing. As delivered, and in normal use with the oxide film that forms naturally to protect the metal intact, stainless steel is among the most noble and corrosion resistant of materials. However the maintenance of that oxide film requires the presence of oxygen which in certain places (such as under a barnacle) may be absent. In other areas as, for instance, where a shaft passes through a rubber bearing, the oxide film may be worn away and the oxygen prevented from reaching the surface. Here what is known as crevice corrosion may occur, and where this happens stainless steel drops down the galvanic series towards the base end and is liable to corrosion. The metal does not change; it is simply that its protective skin is destroyed.
It would appear that those of us with the SS apendages to our keels all have the problem. It is caused when stainless steel is starved of oxygen. When I cleaned up the filler around the keel when copper-coating last year, corrosion was evident. I then antifouled over the exposed SS which again started corrosive action. The knowledge of Stainless Steel working at the time of either design or build was clearly limited.
I am advised that I should clean up the stainless and just leave it bare as water has sufficent oxygen to stop any further action. I am looking at other solutions. |
|
Join Date: 30 January 2007
Posts: 461 |
||
|---|---|---|
|
John, |
|
Join Date: 02 January 2008
Posts: 1547 |
||
|---|---|---|
|
John Could I ask how you cleaned away the filler from the stainless? If wire brushing was used, the brushes are mostly of ordinary (=rusting) steel, and traces of this then remains on the surface. This will show up as rusting of the surface, although it is only superficial, and can be removed by light sanding. Suggest that you check if this is the reason Kind regards Lars |
|
Join Date: 16 May 2009
Posts: 252 |
||
|---|---|---|
|
The crevice corrosion phenomenon has been well known for many years - the key thing to start it is the creation of the crevice itself (which has to be in a particular range of size for this to ideally occur, common examples of the worst geometries are like gaskets on flanges or washers on bolted assemblie, so if you picture putting filler or bondo on the SS and water getting under there you can see it would be just like that kind of worst case geometry, and trouble begins. Other things come into play and it can get complicated - but velocity is better than stagnant, so one option is to sail the hell out of her and never tie up, no worries - but if you have to dock sometimes, treatment might be in order. Epoxy paint, well applied, before any filler or bondo will help, then fill and final paint after. Something that has gotten better since the 70's are the materials and there are very nearly crevice corrosion immune grades of SS around, many made for the North Sea rigs and similar. Avesta 254 SMo is typical of an austenitic grade, there are others like Ferralium 255, a duplex grade, the list goes on. You can get this material in sheet, strip, plate, it is weldable, etc. So if you have to do any replacement of the corroding older SS, I would recommend materials like this, even though a little more costly up front.
|
|
Join Date: 02 January 2008
Posts: 1547 |
||
|---|---|---|
|
Dear Geoff You are right that the offshore industry has brought us more corrosion resistant and stronger stainless steels like the Duplex and Superaustenitic grades. The pitting resistance for stainless can be defined with the Pitting Resistance Equivalent Number, for short PREN, which can be calculated with a simple formula based on the composition of the steel. Here a list of PREN:s for some commonly used materials, the higher the better: AISI 304 20 AISI 316 25 AISI 329 31 (Duplex) 22-13-5 39 (Rod rigging) Avesta 254 SMo 48 (Superaustenitic) For the older Swans with AISI 316 stainless material regular inspection is recommended for the following underwater items - Docking shoe on underside of keel - Keel trailing edge * - Keel pocket covers * - Lower ends of keel bolts * - On centerboard models the pennant tube, pivot and stopper pins, centerboard *, centerboard casing * - Propeller bracket - Rudder skeg fairing pieces each side - Rudder leading edge fairing piece - Rudder stock and attached straps holding the blade - Rudder skeg heel piece * - Rudder stock casing - Trim tab casing * - Trim tab stock * - Trim tab strap fitting * - Trim tab lower pin assembly * - Propeller shaft * - Stern tube - Through-hull fittings of stainless * * refers to some models only Routine inspection is particularly important for finding corrosion in time on critical parts long before it may become severe and finally cause leaking. Such parts are the stern tube, through-hull fittings, CB pennant tube, rudder and trim tab casings Kind regards Lars |
|
Join Date: 01 February 2007
Posts: 234 |
||
|---|---|---|
|
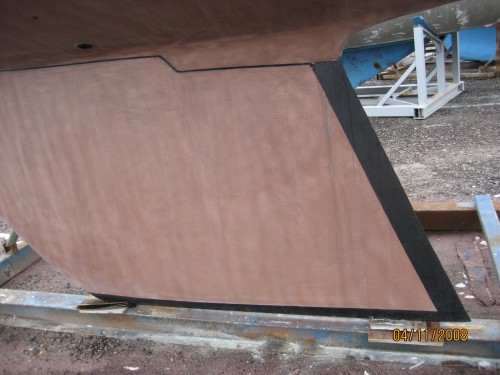
Daniele / Lars / Geoff. The filler had been falling off for a number of years, and I repeatedly kept putting more on. In an effort to reduce the amount of maintenance and cost each layup period I decided to clean up the fin completely. The yard carried out the work so I am not sure of the method they used. Daniele, the fin is very securely attached to the keel, that is not the issue but the trailing edge is getting thin and spoiled. Unless you clean away your filler you will not see if you are suffering also. The surveyor said it was most likely that all yachts with this type of construction will have the problem. Lars, I propose to clean up the remaining filler and antifouling by lightly shotblasting. The surveyor recomended leaving it bare afterwards as there is oxygen in salt water, but that way it will foul and if barnicles grow will continue to deterioate under the barnacles. It also look bad. So this is not an acceptable solution to me. I am trying for a more perminant solution. Geoff offers two solutions, but is it possible to weld two types of stainless together? I am also looking at removing the stainless fin completely and replacing with carbon but still more research to do. Lars, a few years back I took my keel off, the stainless bolts are so massive that this does not worry me.
|
|
Join Date: 16 May 2009
Posts: 252 |
||
|---|---|---|
|
Two things - first, welding mixed grades - can it be done, yes, but - even if you weld same to same, the big problem is HAZ corrosion (heat affected zone has carbide precipitation, which makes that area preferentially corrode unless you solution treat after welding, which is impossible in this case) - so welding might not be a good idea, unless you could remove the part, weld/fabricate the new, heat treat, then reattach. As for the keel bots, size v corrosion - keep in mind that once crevice corrosion starts, it can be insidious and catastrophic, and can lead to failure even on bigger parts - which in the first place makes me a little worried to investigate my own bolts, but on the other hand, if there were a problem with potential corrosion failure of keel bolts in these boats, I would have to hope Nautors or someone would have the flag up by now. Does anyone have a detail sketch showing how the keel is bolted on? I know in my boat the heads are all glassed in from the inside of the bilge - in my boat, the previous owner did expose the bolts, retorque, and reglass, but that didn't involve exposure or inspection of the rest of the bolt.
|
|
Join Date: 02 January 2008
Posts: 1547 |
||
|---|---|---|
|
John Suggest you try the wet sanding approach on the trailing edge, and fill, fair and paint as for the rest of the keel. What is the black stuff on the trailing edge in your picture? Leaving bare not recommended You mention shotblasting, it should be noted that if done with steel shot this will cause rusting. Sand or grit blasting would be preferable. The stainless trailing edge is not structural, and could well be removed if it continues to cause problems. To replace it with carbon fibre is not advisable, carbon must not be used underwater in contact with metals, electrochemically it is the same as graphite and will cause galvanic corrosion. Can agree with Geoff that welding in situ is going to cause weld decay, (the common name for carbide precipitation). Generally it would be preferable to use grade 316L stainless for welding, this avoids the mentioned problem. L stands for low carbon.
Geoff There is no history of corrosion on keel bolts. The critical area would be the short distance between the lead keel and the nuts, but there is plenty of mastic around the bolts here, keeping the water out. The lead and the galvanized washers also work as sacrificial anodes for the bolts if needed. The bolts are cast into the keel, and can not be removed, or inspected except by NDT from the top. At the time of build the practice was to glass in the bolts. This glassing could well be removed, then the nuts need to be secured in some other way. Lars |
|
Join Date: 16 May 2009
Posts: 252 |
||
|---|---|---|
|
Thanks for the reply particularly with respect to the bolts - I appreciate it.
|
- Threads : 1702
- Posts : 10217
- Members: 821
- Online Members: 0