Do you want to be informed on new Posts on this Thread? (members only)
| Keel Bolts and General Topics on Keel - Swan 47 Aft Keel Bolts |
|---|
|
Join Date: 17 November 2016
Posts: 29 |
||
|---|---|---|
|
Swan 47 Aft Keel Bolts Please see attached 3 pictures of the aft keel bolts. I have read that these would have been covered in GRP originally so I guess they have been inspected or tightened. The farthest aft keel bolt has a washer that I do not think is original. I'm surprised that the nuts were not locked after the GRP was removed. Any comments with regards to the originality and suggestions with regards to action are welcome. I do have minor cracks at both ends of the keel but no leakage in or out. I will attempt to tighten them as per below:
There are 15 bolts M24, and 3 bolts M30, M means metric and the number is thread diameter in mm. The bolts and nuts are stainless AISI 316. Be careful not to cause thread galling, this happens fairly easily if forcing the nut onto the bolt with this material. The standard practice at the time of build was to cover the bolts with GRP. If you remove the GRP the nuts have to be locked in a reliable way.
Recommended torques are: M24 - 260 Nm, M30 - 510 Nm Thanks, Toronto Till - 1981 Swan 47/57 - "Till" 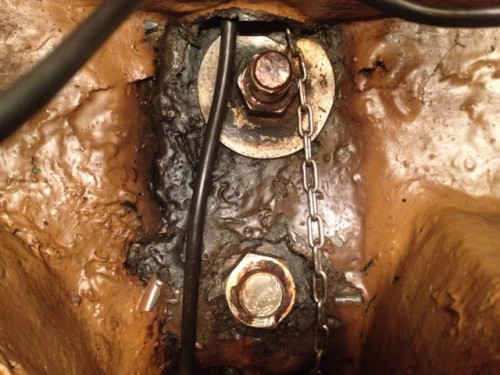 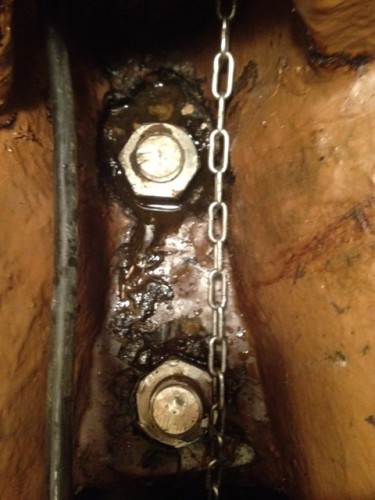 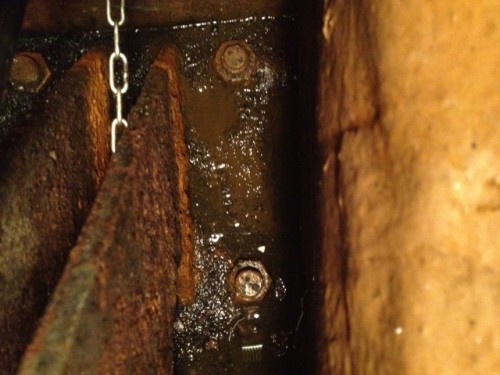 |
|
Join Date: 01 March 2007
Posts: 147 |
||
|---|---|---|
|
Hi toronto till, The problem we encountered when dealing with the aftmost bolt was due to the fact that it came up through the narrow gap between the laminations of the hull in that area, and was sitting on just filler. We also had cracking and the movement of the keel had made the hole for the bolt bigger, hence it leaked. I had a large steel plate made up to bridge across this area, acting as an enormous washer. It is not ideal, or pretty, but it has brought some strength back to an area which is inherently weak due to the dimensions. Rob Sarabande. 47/029  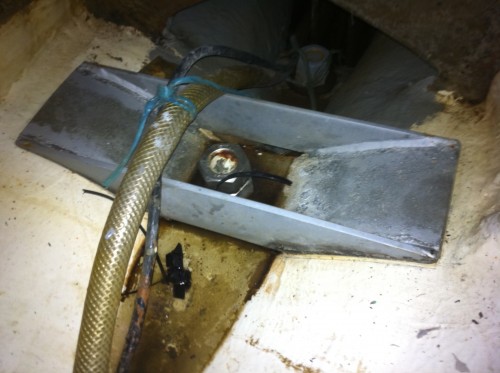 |
|
Join Date: 02 January 2008
Posts: 1547 |
||
|---|---|---|
|
Dear Toronto Till The keel bolt torques you found are for dry threads, if you grease them smaller torques are sufficient, 172 respective 343 Nm.
Referring to the single round washer I would recommend that the three aftermost bolts get a common washer shaped so it fills the flat area of the bilge, with its lower edges rounded so they conform with the laminate.
The lifting lug would benefit from regalvanizing.
Kind regards
Lars
|
|
Join Date: 17 November 2016
Posts: 29 |
||
|---|---|---|
|
Thank you for the responses. Rob, your picture shown 3 bolts aft of the bilge sump wheras I have 4 - 2 at lower level and 2 at the higher level. Is your aft keel bolt M24 or M30? Mine is M24. Lars, I'm not sure I can make a common plate for the 3 aft washers since they are at different elevations in the bilge. I'd like to make a plate for the aft 2 bolts but the 2nd last square washer is buried in epoxy. Should I continue to chip this out? Please see attached pictures of my progress. I removed the aft nut - M24, and it does not appear to be original - the finish is not the same as the 6 sump keel bolts. Other than the large round washer on the last keel bolt, I can't find any original square washer buried in the epoxy. I'm hesitant to chip away too much. Looking at the construction plan, there are only 3 keelbolts aft of the sump. Why do I have 4? With regards to the lifting lug, I've removed all the M24 nuts but it seems to be also covered in epoxy. I'm continuing to chip it away around the perimeter and hopefully will be able to break the bond. Thanks again for your help, Toronto Till - 1981 Swan 47/57 - "Till"  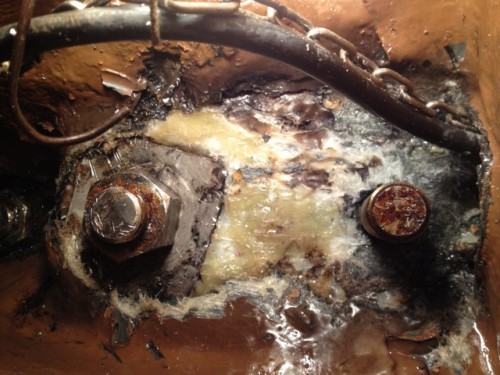 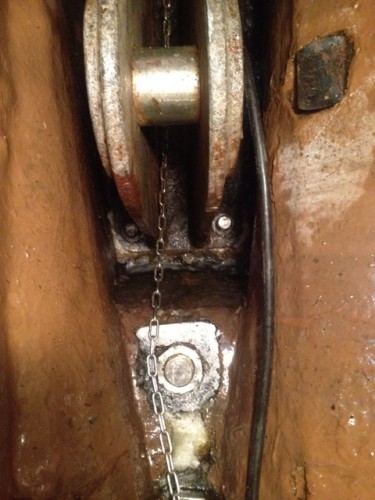 |
|
Join Date: 17 November 2016
Posts: 29 |
||
|---|---|---|
|
CORRECTION - the aft keelbolt appears to be 1"-8 UNC - not 24mm. Toronto Till - 1981 Swan 47/57 - "Till" |
|
Join Date: 02 January 2008
Posts: 1547 |
||
|---|---|---|
|
Dear Toronto Till If you have one more bolt, and with a different thread, it has been added later. An interesting question is how this bolt is anchored in the lead, anything visible on the outside?
You can very well make bigger washers at different levels. Pls note that for M24 bolts the present Recreational Craft Directive recommends a minimum washer thickness of 16 mm, and you may need to chip away some laminate in order to have enough thread length exposed for this.
Epoxy was not used originally.
Kind regards
Lars
|
|
Join Date: 17 November 2016
Posts: 29 |
||
|---|---|---|
|
Lars, there is nothing I can see on the outside of the keel. Maybe the keel was removed. With regards to chipping away laminate, how far is too far? Am I correct to assume the square washers were installed on top of the original bilge and anything above that level was added later and should be safe to chip away? I am not making any progress with the lifting lug. Even the keelbolt holes seem to be filled with epoxy. Does anyone know the clearance around the keelbolt and the lifting lug bottom plate? Maybe I can drill around the bolts. Two men and 8 ft of leverage had no effect. Thank you for your help. Toronto Till - 1981 Swan 47/57 - "Till" 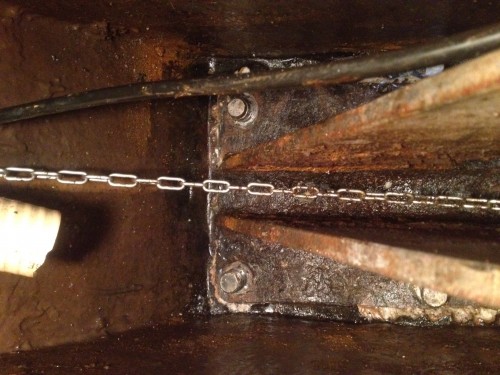 .JPG) |
|
Join Date: 02 January 2008
Posts: 1547 |
||
|---|---|---|
|
Toronto Till Likely that the added bolt was threaded into the lead.
The top of lead is a straight line, and this should enable you to estimate the laminate thicknesses aft.
Suggest that you put a jack onto one keel bolt and the jack upper end against the lifting lug pin or its flange to break the lug loose
Kind regards
Lars.
|
|
Join Date: 17 November 2016
Posts: 29 |
||
|---|---|---|
|
Lars, that is a great suggestion and I will give it a shot! Thank you, Toronto Till - 1981 Swan 47/57 - "Till" |
|
Join Date: 01 March 2007
Posts: 147 |
||
|---|---|---|
|
Hi Toronto Till,
I can only assume that the 3 bolts on Sarabande (029) are the original, and the aftmost is much longer (as per the photo) to allow the narrow gap to be filled to allow access to the washer and nut. If you have 2 in this area, perhaps it is because previously there was some movement there and this was a retrospective remedy - indeed, Sarabande was very stressed at this point! I am sure the aftmost is M24. Lars suggestion of lifting the hook point with hydraulic should work well if you can get a good purchase, my grandfather ( an engineer) used to say, "give me a big enough lever and I will lift the world!" Good luck
Rob Sarabande 47/029 |
|
Join Date: 01 March 2007
Posts: 147 |
||
|---|---|---|
|
Here are the 3 bolts, all M 24's. It be interested to know the exact position of your 4th? 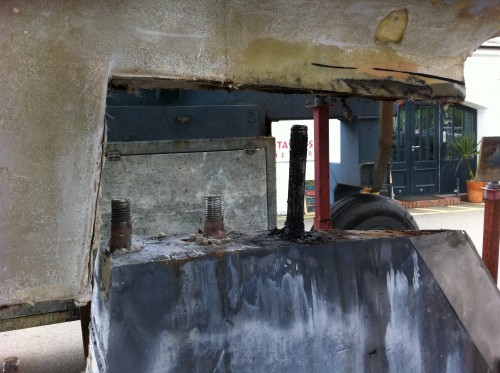 |
|
Join Date: 17 November 2016
Posts: 29 |
||
|---|---|---|
|
Thank you for the encouragement. I was able to remove the lifting lug with hydraulic jacks and some steel work. Strangely the bolt holes in the lifting lug are quite large but there were no washers installed. Now I will clean the area and continue to work on the aft keel bolts. Toronto Till - 1981 Swan 47/57 - "Till" 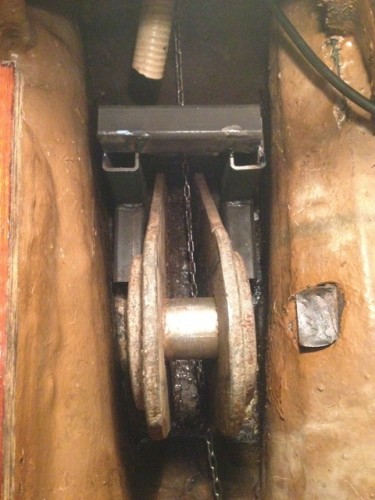 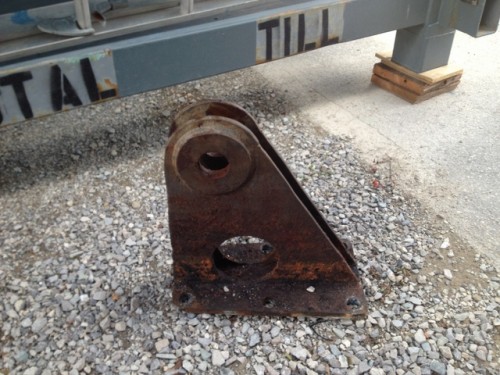 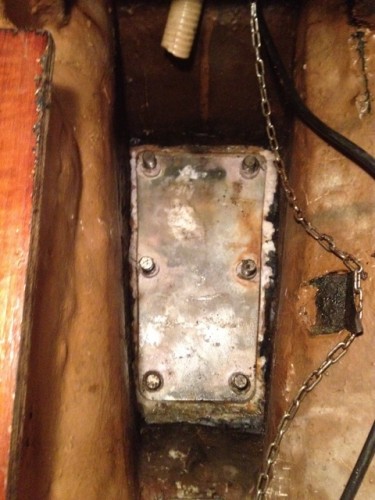 |
|
Join Date: 02 January 2008
Posts: 1547 |
||
|---|---|---|
|
Dear Toronto Till Referring to the last photo you posted - is there a stainless plate under the lifting lug? Would suggest this is not original
Kind regards
Lars
|
|
Join Date: 17 November 2016
Posts: 29 |
||
|---|---|---|
|
Lars, it is only very clean fiberglass. I've attached a poor closeup. You can see how the holes in the plate were filled. Would this surface have been originally painted like the rest of the bilge and how should I prepare it for re-installation? Toronto Till - 1981 Swan 47/57 - "Till" 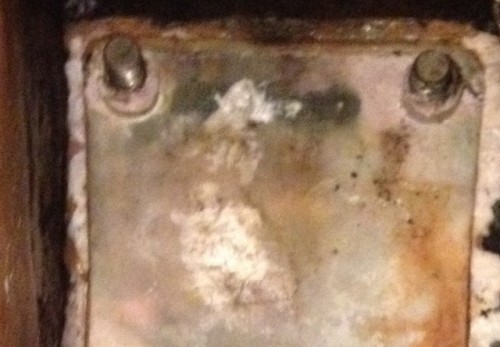 |
|
Join Date: 01 March 2007
Posts: 147 |
||
|---|---|---|
|
Nice job removing the lifting lug, must have been very satisfying. I'd be interested to know if you intend to re install it, or simply have a flat plate washer instead ? I find the lug interferes with my bilge pump arrangements and also makes cleaning the bilge nigh on impossible, so I reckon I would not bother as I cannnot envisage ever using it.
Rob Sarabande 47/029 |
|
Join Date: 02 January 2008
Posts: 1547 |
||
|---|---|---|
|
Toronto Till Thank you for the information.
What is the white stuff around the edges, appears to be resin pressed out when the lug has been forced down during installation? White resin is not original, you mention epoxy, and there is some also around one of the aft keel bolts.
If the lug was bedded down in epoxy it is no wonder that it required a jack for getting it off.
With epoxy no preparation of the surface is needed, you just shave a little off the resin bushings at the root of the bolts, so the lug goes down easily.
Is there a slightly raised plinth for the lug also?
Kind regards
Lars
|
|
Join Date: 17 November 2016
Posts: 29 |
||
|---|---|---|
|
Rob, I haven't decided if I will re-install the lug. I agree access around it is difficult however I enjoy having Rod Stephens' signatures around the boat. Lars, no plinth. What you are seeing is recessed. My guess is that the lug was installed then epoxy was filled around it. As I jacked up the lug, only the epoxy around the sides was getting loose. There was no adhesion underneath. Am I correct that the surface of this sump would have been flat originally? I will start to cut out the epoxy around the last (2nd last in my case) keel bolt and remove the square washer. My goal is to create a flat surface for a large 2-hole washer for my 2 aft bolts. Toronto Till - 1981 Swan 47/57 - "Till" |
|
Join Date: 02 January 2008
Posts: 1547 |
||
|---|---|---|
|
Toronto Till Thank you for the information
During assembly the lug plate was bedded down in wet polyester laminate, and a shallow recess was formed. The epoxy around the edges has been added at a later stage.
The recommendation is to paint the uncovered polyester surface with topcoat.
Kind regards
Lars
|
|
Join Date: 05 December 2012
Posts: 4 |
||
|---|---|---|
|
Toronto Till Thank you for the information
During assembly the lug plate was bedded down in wet polyester laminate, and a shallow recess was formed. The epoxy around the edges has been added at a later stage.
The recommendation is to paint the uncovered polyester surface with topcoat.
Kind regards
Lars
This is an extremely interesting post. Since 2007 I own Ubuntu (Called Pirouette at that time) a Swan 47#054 and have similar keel issues as described in this post. All around the keel joining the hull one can see a fine crack with water dripping out when placed on the hard. No leaking inside. Clearly there is evidence of some movement of the keel. I am planning to repair this in stages. Firstly try to loosening keelbolts and then grinding out the material between the hull and the keel, replace the grinded our material with filler and tighten up keelbolts again. Second stage would be to drop the keep and follow the steps as I have been able to read in the post. Can anyone recommend me what type of filler to use? Some people must have tried this first stage already, any recommendations?
Robert de Vlaming s/y Ubuntu, Aruba
 leaking keel hull joint 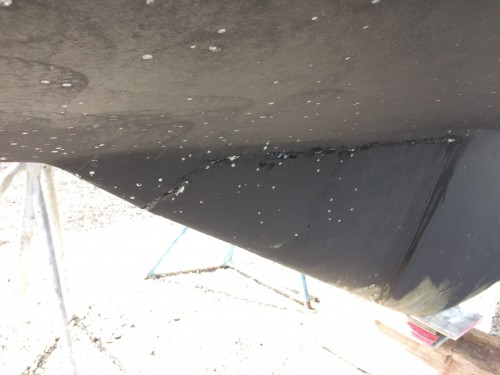 leaking keel hull joint 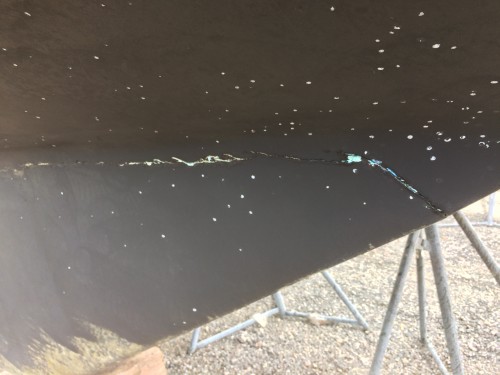 same |
|
Join Date: 02 January 2008
Posts: 1547 |
||
|---|---|---|
|
Dear Robert It is suggested you support the hull so the keel is slightly off the ground when you attempt to open the cracked joint.
If the keel drops when the bolts are loosened you could as well lift the hull some more so the bolts can be inspected over their whole length.
It is suggested you check what the joint material is now.
If you record the torques required to make the nuts move this should disclose if the joint had loosened.
The joint filler needs to be of a thickened type so it does not drain out, for example West G/Flex 655 is suitable
Kind regards
Lars
|
|
Join Date: 05 December 2012
Posts: 4 |
||
|---|---|---|
|
Dear Robert It is suggested you support the hull so the keel is slightly off the ground when you attempt to open the cracked joint.
If the keel drops when the bolts are loosened you could as well lift the hull some more so the bolts can be inspected over their whole length.
It is suggested you check what the joint material is now.
If you record the torques required to make the nuts move this should disclose if the joint had loosened.
The joint filler needs to be of a thickened type so it does not drain out, for example West G/Flex 655 is suitable
Kind regards
Lars
Dear Lars, Many thanks for your suggestions, that is what I will do, very helpful. I suspect the joining material is still the original material, apart from some patch work by the previous owner. I will start the works in 2 1/2 weeks time so I have time to prepare everything well in advance. I will let you know the results. Best regards Robert |
- Threads : 1701
- Posts : 10215
- Members: 820
- Online Members: 0