Do you want to be informed on new Posts on this Thread? (members only)
| S&S Swan Maintenance - Sliding fwd hatch of Swan 47 leaks |
|---|
|
Join Date: 30 January 2007
Posts: 461 |
||
|---|---|---|
|
Lars, |
|
Join Date: 29 January 2007
Posts: 1018 |
||
|---|---|---|
|
Dear Daniel,
|
|
Join Date: 02 January 2008
Posts: 1547 |
||
|---|---|---|
|
Daniel The design includes zippers each side, with these closed the dodger fits snugly over the hatch, with zippers open the dodger can be lifted slightly off the hatch enabling ventilation to be arranged. Works also with hinged hatches, then the side pieces inside the zippers are triangular Lars |
|
Join Date: 30 January 2007
Posts: 461 |
||
|---|---|---|
|
Thank you all, |
|
Join Date: 02 February 2007
Posts: 202 |
||
|---|---|---|
|
Forward hatch is leaking: Hello everyone, very interesting topic indeed. From our experience with ou 41/022 one must first check wether the hatch is really of a drop down type. On our boat it was not (1974) and was leaking like mad. ... and had been from 182 to 2000! After a discussion with dear professor back in 2001 we modified it to a drop down type wich is rather simple. (see attached drawings he sent us at the time). IE the plastic rails on which the hatch is sliding must be cut at the forward and back ends and screwed to the upper wooden frame (D). The Stainless steel (E) piece holding the hatch down needs to be replaced so as to allow the hatch to go up by around 1cm when sliding backwards to open. Be careful that the front gap in the plastic rail should be longer than the rear one so that when opening the hatch the front cannot drop in the back gap (hope I'm clear!). Then you have to machine the perspex to make a recess in which the hooks for the four corner fasteners will be, and add rubber seals on the top frame (see drawings). The result in any case is just perfect, no more leakks! 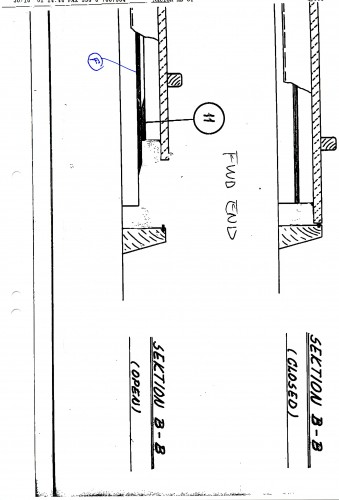 |
|
Join Date: 30 January 2007
Posts: 461 |
||
|---|---|---|
|
Great picture indeed and I wish I could have a copy... |
|
Join Date: 26 March 2008
Posts: 69 |
||
|---|---|---|
|
Hello All: I have been busy with work, so dropped off for a little bit. Never mind. Have attached a series of three pics of our forward hatch cover. In this first picture you will immediately notice that our poor sailboat lives in a marina with alot of mean, nasty power boats. :( Next, you may notice the hatch open with insect screen in place. Essential equipment in the Caribbean. Finally, we can have the hatch cover act as a wind scoop in either direction. At the dock the wind comes from the direction of our stern. At anchor, we turn it around 180 degrees to catch the wind from the bow. Milo Swan 47/048 s/v The Last of the Normal People 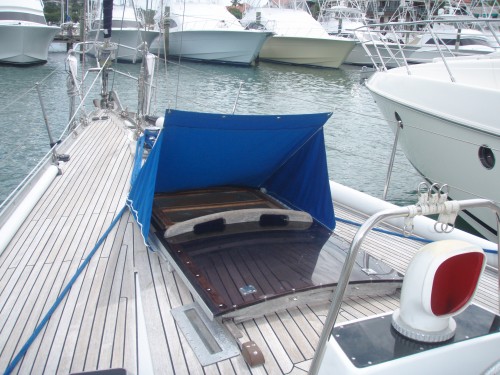 |
|
Join Date: 26 March 2008
Posts: 69 |
||
|---|---|---|
|
In the second picture, the bolt rope fed into the guide track may be seen. 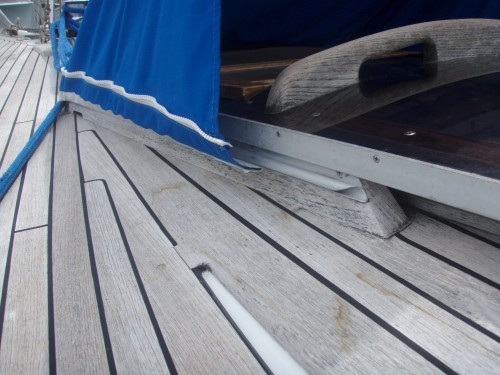 |
|
Join Date: 26 March 2008
Posts: 69 |
||
|---|---|---|
|
Finally, the hatch cover seen facing aft. Note the zipper, which is undone and allows the cover to be opened up. While underway, the cover is collapsed and the zipper closed. If anyone would like any other pics, please ask. Cheers, Milo 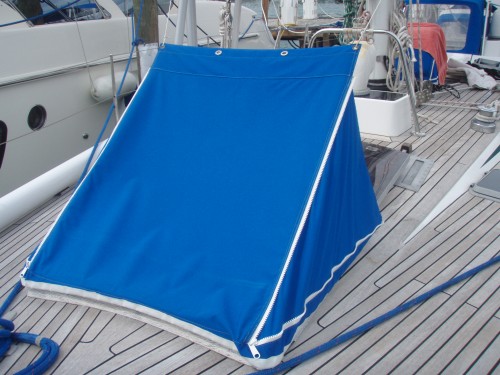 |
|
Join Date: 30 January 2007
Posts: 461 |
||
|---|---|---|
|
Milo, |
|
Join Date: 02 February 2007
Posts: 202 |
||
|---|---|---|
|
Sliding - dropping forward hatch. Here is a second drawing. 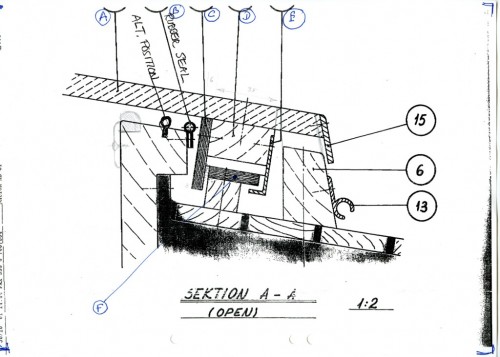 |
|
Join Date: 02 February 2007
Posts: 202 |
||
|---|---|---|
|
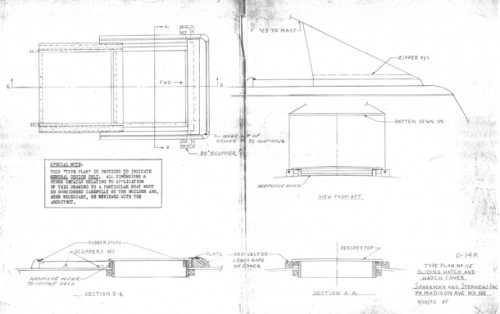
Sliding-dropping forward hatch. Here is my third drawing. About the fabric hatch cover seen in the pictures we have the same arrangement without a zipper and find it really indispensable as a wind scoop. Kind regards. Philippe (41/022) 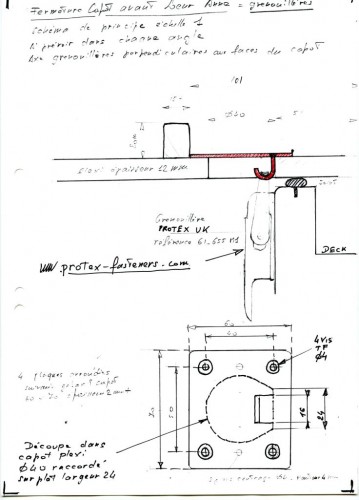 |
|
Join Date: 30 January 2007
Posts: 461 |
||
|---|---|---|
|
Dear all, |
|
Join Date: 26 March 2008
Posts: 69 |
||
|---|---|---|
|
Daniel: The height of the cover is approximately 50 cms (or 20"). I do not use the forward hatch as a routine access when the cover is up. I just used it now as a test and found it was possible, but awkward. (Mind you, I have an aching back and am abot 190cms.) I do think it might be easier if the cover was in the forward facing position instead of how we have it in the aft facing position. A younger or smaller person would have less trouble. You could easily pass small supplies down below, but not large items such as a sail. Our cover's bolt rope slides readily in and out of the groove and changing position or removal is not a problem. It takes a couple of minutes but a child could do it. To hold the cover up we have line we attach from the cover to the side stays. They take a minute to undo or reattached. If facing forward, we have our headsail furled and then secure the headsail sheets snuggly or firmly. With the sheets reasonably taut, we use them to attach the line. Cheers, Milo |
|
Join Date: 29 January 2007
Posts: 1018 |
||
|---|---|---|
|
Dear Friends
 |
|
Join Date: 28 March 2007
Posts: 5 |
||
|---|---|---|
|
Hi all,
 |
|
Join Date: 30 May 2012
Posts: 3 |
||
|---|---|---|
|
HI Lars I found post very interesting about the sliding hatch on alpha we just have to change the original gasket and it will work again perfectly where can i get this gasket and order it we have been sailing alot ,and if the gasket adhérant to the Plexiglas with the 4 attachment there is no leak at all thanks in advance
Bruno |
- Threads : 1701
- Posts : 10215
- Members: 820
- Online Members: 0