Do you want to be informed on new Posts on this Thread? (members only)
| Keel Bolts and General Topics on Keel - Keel problems on Outrageous S&S Swan 47/039 |
|---|
|
Join Date: 16 April 2010
Posts: 36 |
||
|---|---|---|
|
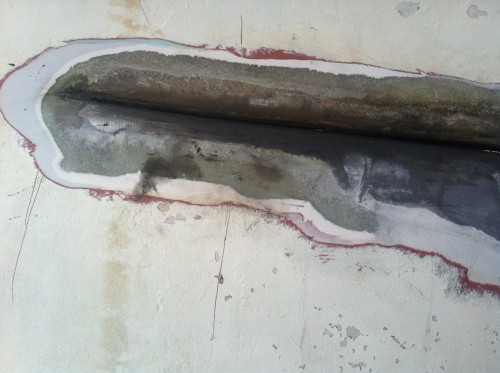
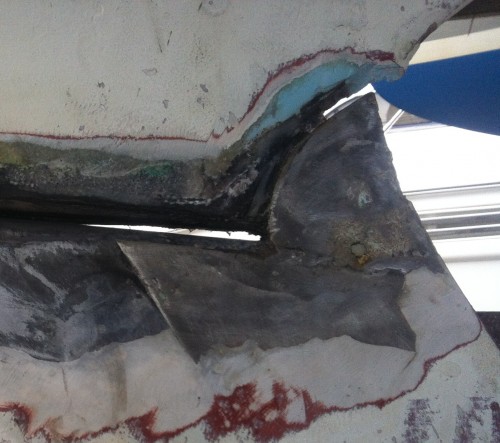
Keel problems on Outrageous S&S Swan 47/039 A�diary of dark discovery In order to be safe the surveyor recommended removal of the keel which one reputable boatyard associated with Swan scoffed at.� Nonetheles I went with the recommendation of the surveyor - fortunately as, on further Investigation the stub of the hull above the keel joint had cracked along almost the whole length of the keel; on one side right through the glassfibre -where the long steel plate had, over time, worked against the hull as the mast pumped� it! It seems the problem is� one of long years of hard use rather than a particular incident.� Part of the problem may be that these beautiful yachts can continue to carry large amounts of sail in high winds without complaint, something that has led us on more than one ocasion to push her pretty hard indeed! |
|
Join Date: 21 September 2010
Posts: 53 |
||
|---|---|---|
|
I am sorry to learn of you problems - have you photographs of the damaged section so we can all learn?
|
|
Join Date: 16 April 2010
Posts: 36 |
||
|---|---|---|
|
Photos will be uploaded in a week or two. Whole hull base currently being ground out before being relaid. Water ingress into the cracks has severely weakened whole of area under mast step which all has to be replaced. Ouch! |
|
Join Date: 23 October 2011
Posts: 150 |
||
|---|---|---|
|
I bought my 47 Grampus #17 in 1995. I observed a crack in the aft area of the joint of the lead keel. I am pretty sure that there was a position of Nautor on this topic, as I saw in a letter of the shipyard in reply to the previous owner. The reason of the unconvenient looked to me rather strange: if I remember well it was stated that the crack was due to different coefficients of thermal expansion of lead and fiberglass and suggested to fill the gap with silicone.
|
|
Join Date: 23 October 2011
Posts: 150 |
||
|---|---|---|
|
Oops, Grampus is hull # 16.... |
|
Join Date: 16 April 2010
Posts: 36 |
||
|---|---|---|
|
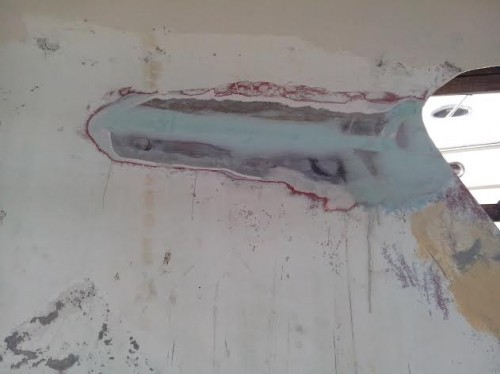
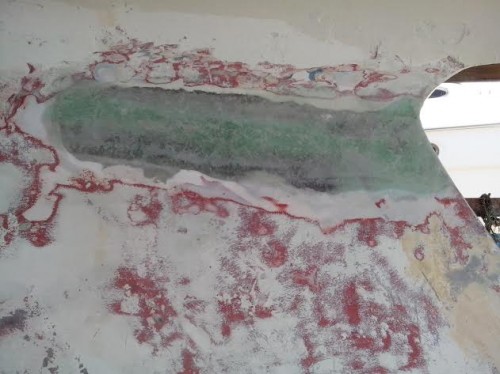
Oops, Grampus is hull # 16.... The keel is now off and it is not a Pretty picture. Water ingress between the keel and hull, apparently over many years as well as the working of the whole hull stub area has led to severe delamination and weakening of the whole area. A sacrificial opaque glass fibre shell has been applied. All of the bad glass ground out and a new stub laid tapering up to the first stringer. The keel goes back on next week at which point all (except my bank balance) will be heading towards relaunch mid July. Pictures will be uploaded once received from the surveyor. |
|
Join Date: 25 July 2008
Posts: 30 |
||
|---|---|---|
|
Dear Mark and dear Mateo, Rumtrader (47,059) also show these cracks between the keel and the hull. Following the recommendation of the different post on this forum I have just sealed the crack every year. They seem to appear more and more quickly during the season. Can you send me picture of the cracks and the way you solved the problem. Kind Regards, Ludovic 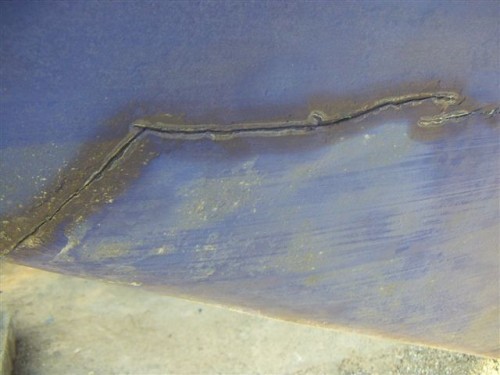 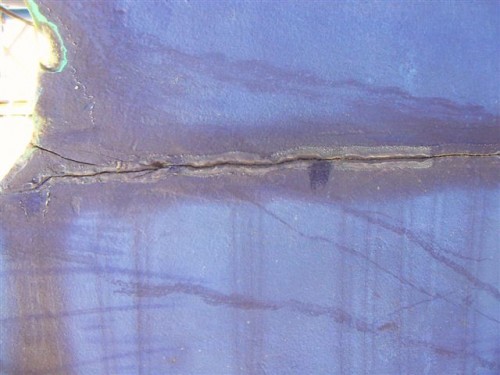 |
|
Join Date: 16 April 2010
Posts: 36 |
||
|---|---|---|
|
Dear Mark and dear Mateo, Rumtrader (47,059) also show these cracks between the keel and the hull. Following the recommendation of the different post on this forum I have just sealed the crack every year. They seem to appear more and more quickly during the season. Can you send me picture of the cracks and the way you solved the problem. Kind Regards, Ludovic Sorry to hear about rumtrader. Am still trying to get pictures from surveyor. If you have a problem of the same severity you will probably observe stringers detaching from hull above stub. Tapping along the hull above the stringers when rumtrader out of the water will show very easily whether the separation has occurred or not. Am happy to talk further if necessary. You can contact me on mark.stevenson@bluewin.ch or on + 41793415037
|
|
Join Date: 23 October 2011
Posts: 150 |
||
|---|---|---|
|
I bought my 47 Grampus #17 in 1995. I observed a crack in the aft area of the joint of the lead keel. I am pretty sure that there was a position of Nautor on this topic, as I saw in a letter of the shipyard in reply to the previous owner. The reason of the unconvenient looked to me rather strange: if I remember well it was stated that the crack was due to different coefficients of thermal expansion of lead and fiberglass and suggested to fill the gap with silicone. I have a different opinion, not so easygoing as from Nautor but, too, not so dramatic. It would be good to know from the professor his opinion and, too, a search in the Nautor archives. It is important to see the pictures, too I noticed last summer in case of relatively rough sea that the bilge pump was working too often. 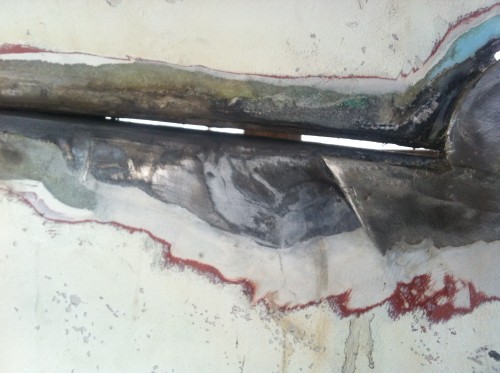 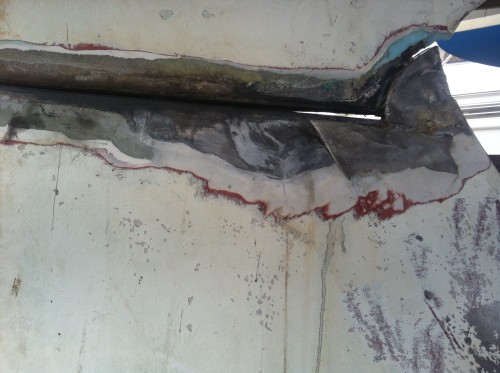 |
|
Join Date: 23 October 2011
Posts: 150 |
||
|---|---|---|
 |
|
Join Date: 02 January 2008
Posts: 1547 |
||
|---|---|---|
|
Dear Matteo
|
|
Join Date: 23 October 2011
Posts: 150 |
||
|---|---|---|
|
Dear Lars,
   |
|
Join Date: 02 January 2008
Posts: 1547 |
||
|---|---|---|
|
Dear Matteo
|
|
Join Date: 23 October 2011
Posts: 150 |
||
|---|---|---|
|
Dear Lars, |
- Threads : 1701
- Posts : 10215
- Members: 820
- Online Members: 0