Do you want to be informed on new Posts on this Thread? (members only)
| S&S Swan Maintenance - Wood toe rail |
|---|
|
Join Date: 08 September 2012
Posts: 6 |
||
|---|---|---|
|
Wood toe rail |
|
Join Date: 15 April 2011
Posts: 393 |
||
|---|---|---|
|
Hi Charlie, I may need to replace my toe rail as well - if you have pictures to post, I would love to see them. And, like you, I am on a limited budget! Chris Mabel's Casse Tete 43/003 |
|
Join Date: 04 July 2009
Posts: 45 |
||
|---|---|---|
|
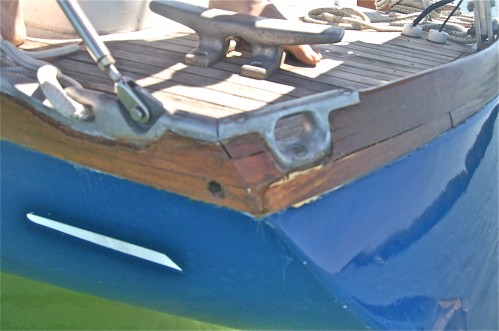
The teak toe rail on Freya, my 1969 43 is in need of significant repair or replacement. I have patched it with dutchmen and filler but the time for real repair is here. The assembly of the wood toe rail is a structurally weak detail though beautifully installed with a taper to accentuate the sheer line with the custom cast aluminum chocks incorporated into its profile. Early in Freya's life (I have had her 14 years), the chocks were overloaded and the lateral loads and bolt compression crushed the wood under and around the several of the chocks. The aluminum chocks bleed oxidized aluminum down Freya's dark blue sides. The rail assembly traps water internally, has saturated the hull/deck joint and this shows itself as streaks in the sheen of the awlgrip topsides. Rebuilding this rail calls for a modified detail. The hull/deck joint consists of an inward turning flange on which the deck is bolted. The fiberglass sub-deck is held back from the edge of the hull creating a stepped cross section. The toe rail is a two piece assembly consisting of a lower teak filler about 3/4" high that sits on the hull in the stepped hull/deck joint and covers the edge of the deck including its teak. There is a continuous gap behind the filler and the edge of the deck. The trapezoidal shaped toe rail with its chocks is installed on top of this filler. Major problems and possible solutions are: 1. Chocks, being incorporated in the rail, have a very narrow bolt pattern, bear on the rail assembly (especially the filler) and are vulnerable to the torquing of of over-loaded dock lines. The chocks need to be moved inboard of the rail, bear on their own solid blocking the sets their height for lead of the dock lines and have a wider bolt pattern. 2. The teak filler is not very thick and there is a continuous void running the length of the rail between the back of the filler and the edge of the deck. Should there be a leak (and water always wins!), the water travels down the sheer and cannot escape. This is a source for water for the dry rot fungus and for the saturation of the hull/deck joint. A previous owner drilled several drain holes in the filler that look like bungs were missing but this is clearly insufficient. 3. The scuppers are cut through the toe rail and cross the void behind the filler. It is just about impossible to caulk this gap inside the toe rail no doubt feeding more water into the rail. 4. All bolts in the hull/deck joint were glassed over by Nautor. This keeps water from draining out. I have exposed all the bolt heads and yes, I have a few more drips below but saturation of the laminate might be reduced. In addition, encapsulation of stainless steel from oxygen leads to corrosion and rust is evident on these bolts. I wish to repair the rail in kind. I need to keep cost down ( I am a Swan owner on a budget!!!), replace the rail at the crushed areas, move the chocks inboard, perhaps fill the water course behind the filler solid and dry out the saturated hull/deck joint. I am looking for technical advice and opinions as to the best way to proceed. Suggested details would be appreciated. Thank you, Charlie Hancock Charlie,
|
|
Join Date: 08 September 2012
Posts: 6 |
||
|---|---|---|
|
For the time being, priorities keep me from focusing on Freya's rail issues. There is another post on this issue with interesting discussions with you and the professor. Most of the top part of my rail is ok excepting three areas where it is split/crushed at the integral chocks that would need to be replaced. I also want to remove and shift the four main chocks inboard as I say in my original post. The suggestion of removing only the bottom filler without removing the toe rail above appeals. As discussed, the space behind the filler would need to be filled solid before reinstalling the filler. What should it be filled with; something hard like epoxy and micro balloons or something with more give to it like a caulk or 4200? Should the replacement filler be adhered or mechanically attached?
 Rail at transom |
- Threads : 1702
- Posts : 10217
- Members: 820
- Online Members: 1