Do you want to be informed on new Posts on this Thread? (members only)
| Keel Bolts and General Topics on Keel - Swan 57 Keel Work |
|---|
|
Join Date: 01 May 2017
Posts: 16 |
||
|---|---|---|
|
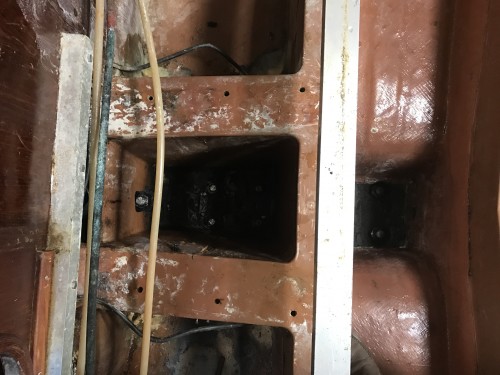
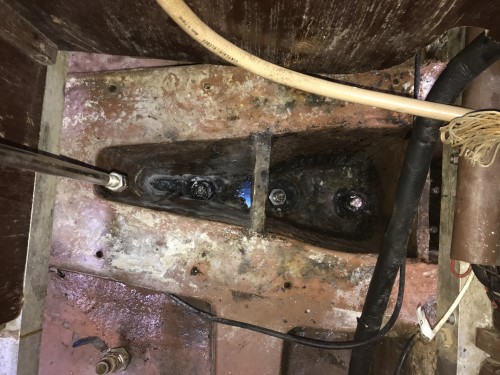
Swan 57 Keel Work Swan Lake (57/027) is preparing to undergo work on its keel. Among many questions, is one concerning a pair of steel plates that are bolted to the aft section of the keel and covered by a thick layer of glass. (See attached photos) My guess is the aft section of the keel is the weakest link of the keel system and the plates were attached at one point to provide added strength to the keel. Does anyone have any information or experience with regard to similar plates? The keel itself appears to be in excellent shape, though the plan is to remove it in 2017 for inspection of the bolts, etc. On another matter, the keel bolts (or the nuts) are glassed over in the bilge. Was this standard practice circa 1981? There is some uncertainty whether the glass was placed over the bolts in the bilge at the Nautor factory or whether a previous owner had the bolts glassed over; the glass work under the mast step appears very sloppy while the work aft of the step appears of excellent quality. Finally, does anyone know of or possess a schematic of the bolt locations? I am trying to determine whether the mast step requires removal to access the forward most bolts. More to follow .... 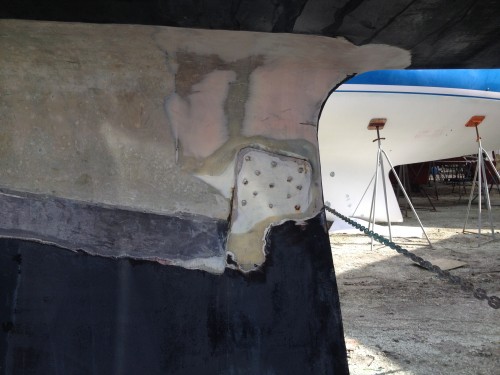 aft keel plate #1 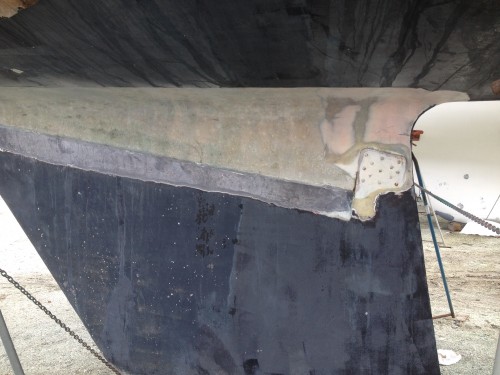 aft keel plate #2 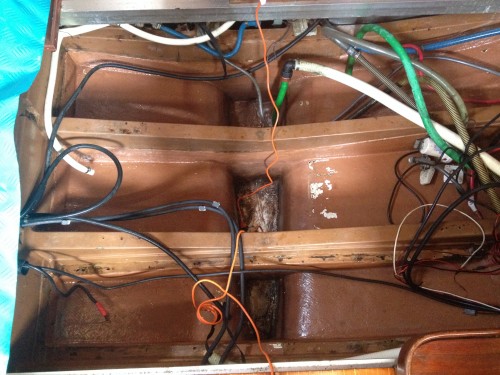 bilge/glassed over bolts |
|
Join Date: 02 January 2008
Posts: 1547 |
||
|---|---|---|
|
Dear Swanlake About half of the 57's have such steel plates instead of bolts at the aft end, but your plates appear to be too far aft, and are probably not original. Maybe the principle was copied.
I found an old notation saying that "keel surgery" was performed on your yacht in 1998, but no more details.
Would suggest that the keel bolts were glassed over originally, input appreciated from other 57 owners pls.
It is not necessary to glass them over if the nuts are locked in some other way.
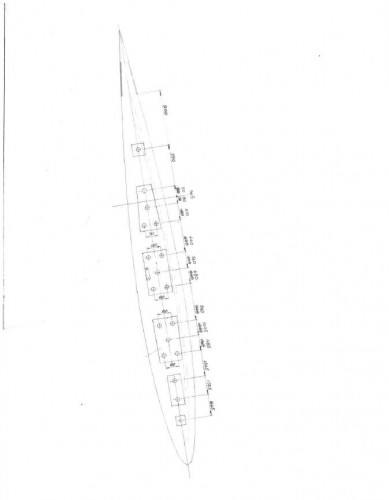
The keel bolts are not the same on all 57's with full keel, there was a change from hull 023. On your yacht there are 18 bolts, 1 x M24, and 17 x M30, and the two forwardmost positions are below the mast support plate.
Suggest you ask spareparts@nautors-swan.com if a keel bolt location drawing is available.
Kind regards
Lars
|
|
Join Date: 01 May 2017
Posts: 16 |
||
|---|---|---|
|
Lars, Thank you for the response and the helpful information. Attached are two diagrams received from Nautors re the keel bolt locations and specifications. More to follow .... jim
  |
|
Join Date: 01 May 2017
Posts: 16 |
||
|---|---|---|
|
While not relevant to the original topic, does anyone have any input regarding the two square sections in the plan for additional lead in the keel? While the boat is out of the water and having keel work done, should the sections be loaded with lead or emptied? Currently, I believe both sections are empty. Thank you! |
|
Join Date: 02 January 2008
Posts: 1547 |
||
|---|---|---|
|
Dear Jim Only a few 57's have the aft keel pocket filled to compensate if there is no mizzen mast nor genset. I believe you have both, plus an extended aft deck.
The pockets take about 400 kgs of lead each. 400 kg causes the yacht to sink 1 cm deeper in the water, and to trim slightly by the bow or stern depending on which pocket is filled.
According to the photos on Marine Traffic it appears your 57 floats nicely in a level position. If the trim screws still are there at bow and stern, readings would show the actual trim.
Kind regards
Lars
|
|
Join Date: 01 May 2017
Posts: 16 |
||
|---|---|---|
|
Time for an update on the keel work. Attached are a few photos of some the keel bolts after cutting away the fiberglass layer covering the bolts. The photos certainly confirm Lars' comment above that not all 57s have the same keel bolt pattern - e.g., the 5-bolt patterns in the diagrams above have a 4-bolt pattern on Swan Lake. Indeed, the photos confirm that not all 57s have the same steel plate patterns below the nuts, either. The last photo presents a mystery begging for an explanation. The upper layer of glass over the bolts is generally hard as nails (as my brother David, who drilled the holes, likes to say). A second layer of glass (black in the photo) is weak and moist and provides a quite rancid odor once exposed. Perhaps the fiberglass "sandwich" relates back to the keel surgery Lars mentioned above. Who nows? Anticipate the keel will be removed from the hull by the end of September 2017. 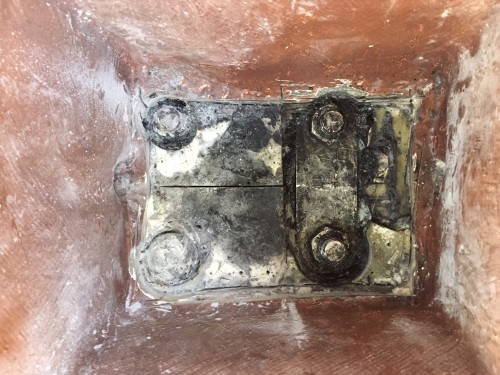 keel bolts 1 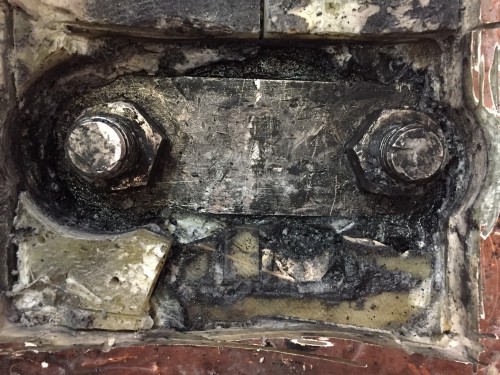 keel bolts 2 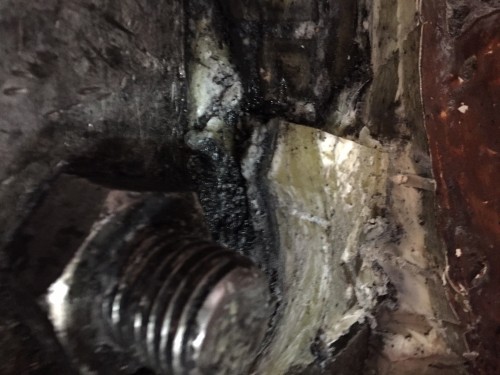 keel bolts 3 |
|
Join Date: 02 January 2008
Posts: 1547 |
||
|---|---|---|
|
Dear Jim Thank you for the photos.
The strap washer connecting two bolts (photo 2) is not original. The recommendation is to make new one piece washers in each section, as shown in the keel bolt location diagram, extending out to the walls with their lower edges rounded per the laminate.
Minimum washer thickness for the M24 bolt is 17 mm, for the M30 bolts 21 mm if steel is used.
The layers of glass turned black are quite likely made with polyester resin suffering from osmosis in the moist bilge conditions. The recommendation is to use epoxy for the repair.
After the keel has been dropped the bolts need to be inspected for corrosion. The recommended tensioning torque for M24 is 172/252 Nm with greased/ungreased threads, for M30 343/504 Nm.
Kind regards
Lars
|
|
Join Date: 01 May 2017
Posts: 16 |
||
|---|---|---|
|
Some more photos from work on 9/17/17. We should know 9/19 whether we founds all the keel bolts. 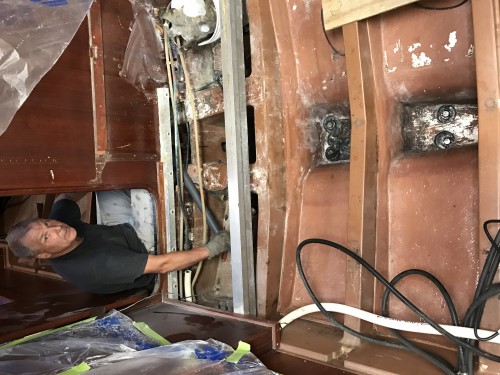 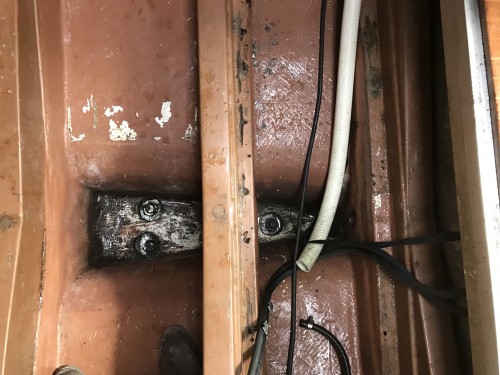 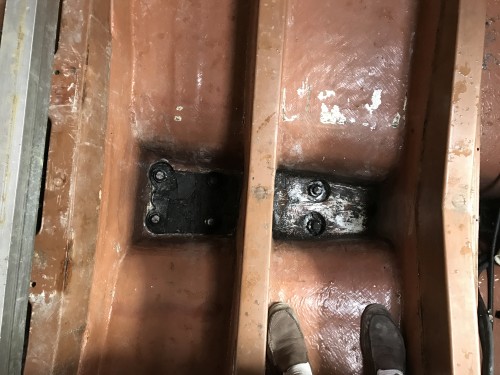 |
|
Join Date: 01 May 2017
Posts: 16 |
||
|---|---|---|
   |
|
Join Date: 27 October 2013
Posts: 60 |
||
|---|---|---|
|
Thank you very much for upload all these photos - it is very interesting!
Slightly off topic, you have obvious removed the mast step - would you mind to post pictures of that? I am very curious to see the design and condition.
Thank you very much in anticipation.
Bjorn
|
|
Join Date: 01 May 2017
Posts: 16 |
||
|---|---|---|
|
Thank you very much for upload all these photos - it is very interesting!
Slightly off topic, you have obvious removed the mast step - would you mind to post pictures of that? I am very curious to see the design and condition.
Thank you very much in anticipation.
Bjorn
Here are some photos of the mast step and the aluminum superstructure underneath the mast step. Both will be refurbished, to some extent. 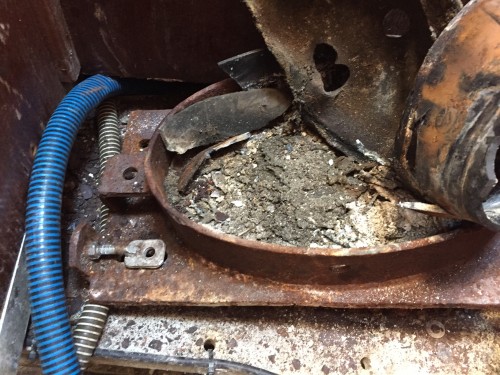 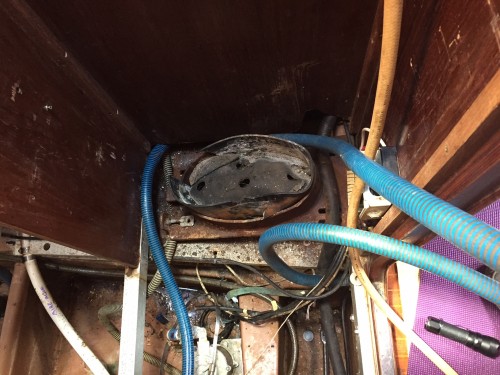  |
|
Join Date: 01 May 2017
Posts: 16 |
||
|---|---|---|
|
The superstructure was not easy to remove, but it can be done! 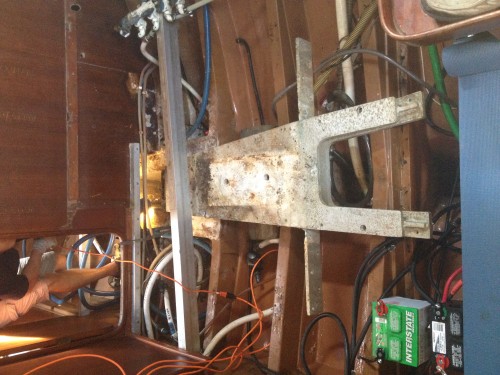  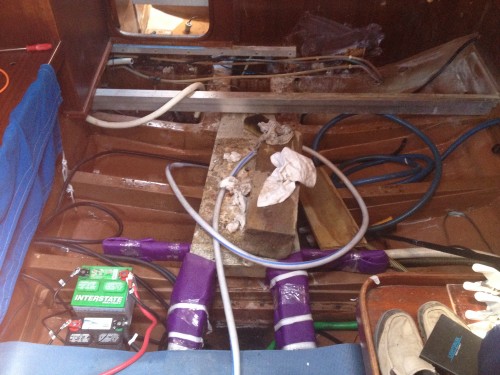 |
|
Join Date: 01 May 2017
Posts: 16 |
||
|---|---|---|
|
Keel is finally off.  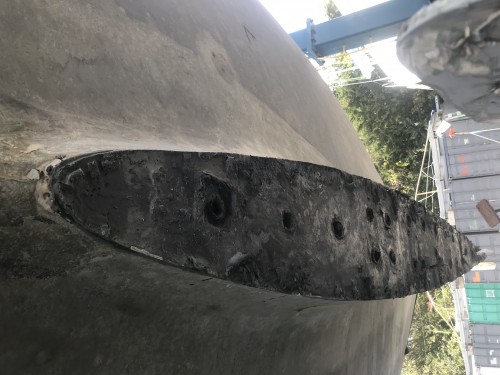 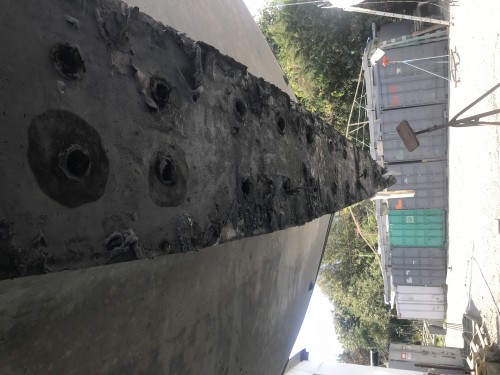 |
|
Join Date: 22 May 2016
Posts: 13 |
||
|---|---|---|
|
Keel is finally off. Regarding the keel work on Swan Lake. I'm very curious to learn what you found after taking the keel off. Did you find the bolts corroded or any other problem? |
|
Join Date: 17 July 2020
Posts: 104 |
||
|---|---|---|
|
hi, seems all 57 are removing keels this winter... some structural problems to solve on 007 too... 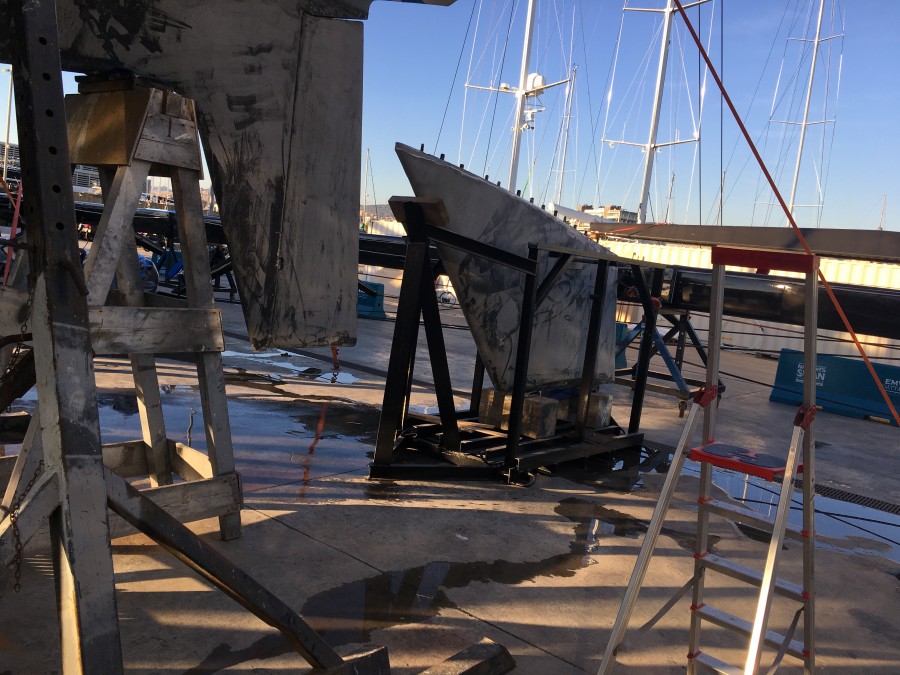 |
|
Join Date: 01 May 2017
Posts: 16 |
||
|---|---|---|
|
It has been a while since the last update so here we go as it's keel season. Attached are a few more photos of the Swan Lake refit which started in 2017 and continues today due to the Covid delay. Hopefully, we will have her back in the water soon. As you'll see it all started with a small crack in front of the keel and then progressed to full-blown keel removal, delamination repair, and reattachment. Would also like to note that the bolt pattern was not as expected so have attached the original plan versus what we found. The one on the right is the "plan" and the one on the left is the "As-Built" which includes plates and additional bolts. Today, the keel has been reattached and we are now waiting to complete the interior with upgraded plumbing, electrical, electronics and wood recondition. 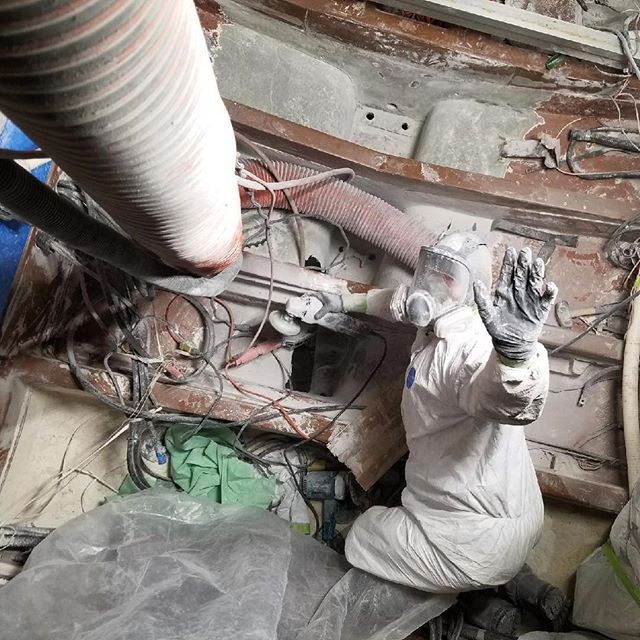 Removal of damaged  Exposed after damaged removed. Notice the lower left section where significant delamination occurred. This was not detected when the project started but was exposed after the keel was removed 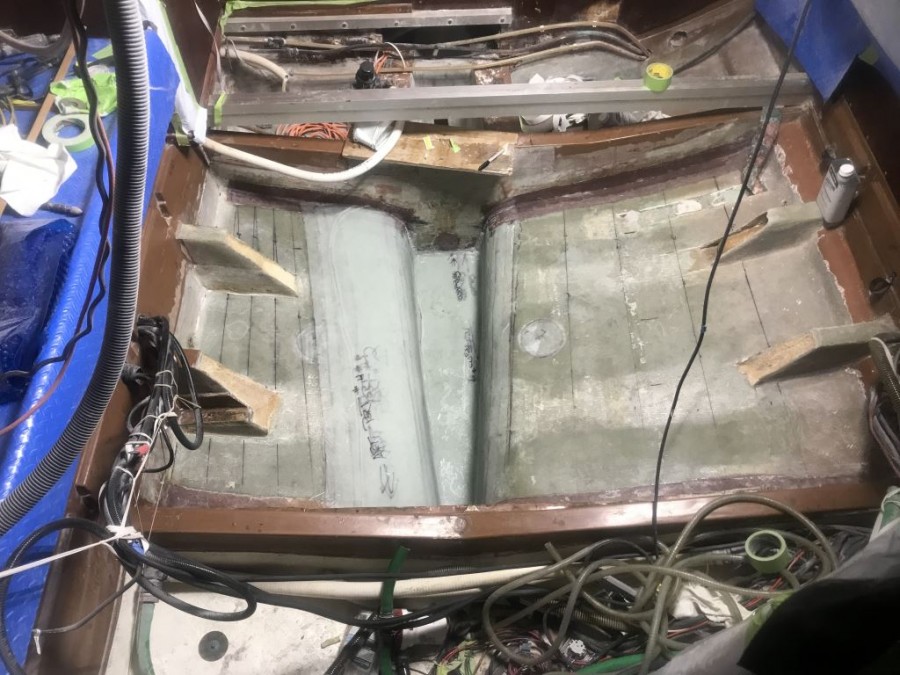 Repair work started |
|
Join Date: 01 May 2017
Posts: 16 |
||
|---|---|---|
|
As previously noted, here are some additional photos for reference. 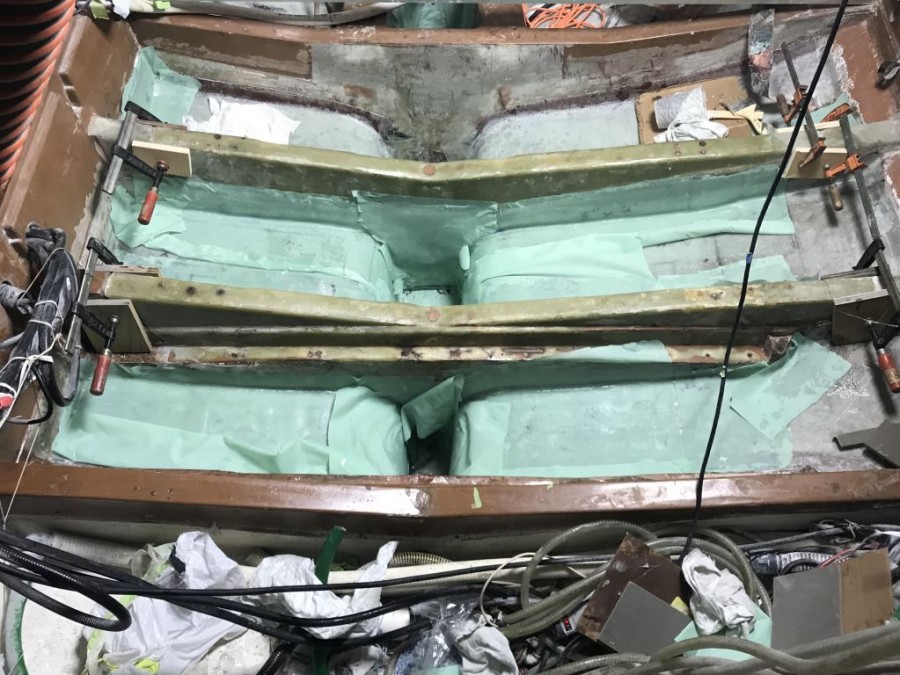 Repairs continue 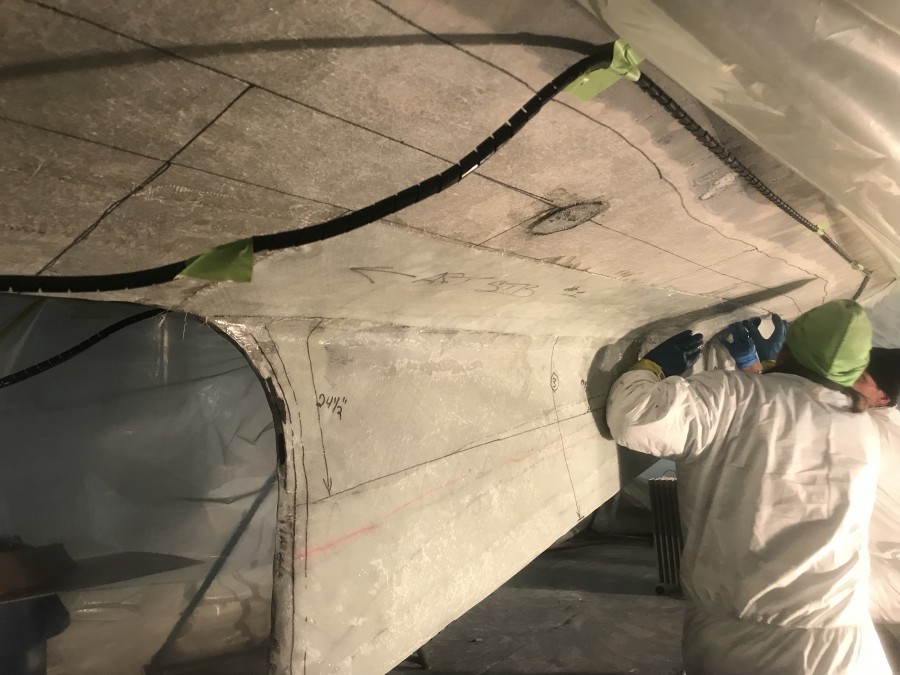 Exterior view 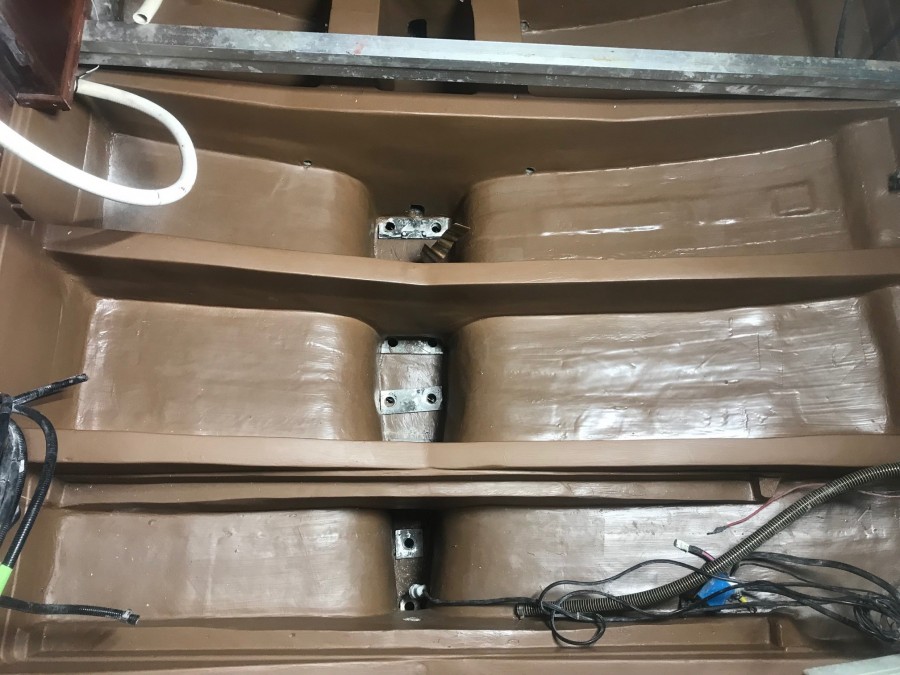 Finished |
|
Join Date: 01 May 2017
Posts: 16 |
||
|---|---|---|
|
And a few more. with new plates to replace what was found from a previous repair along with a photo of the substructure after reconditioning. 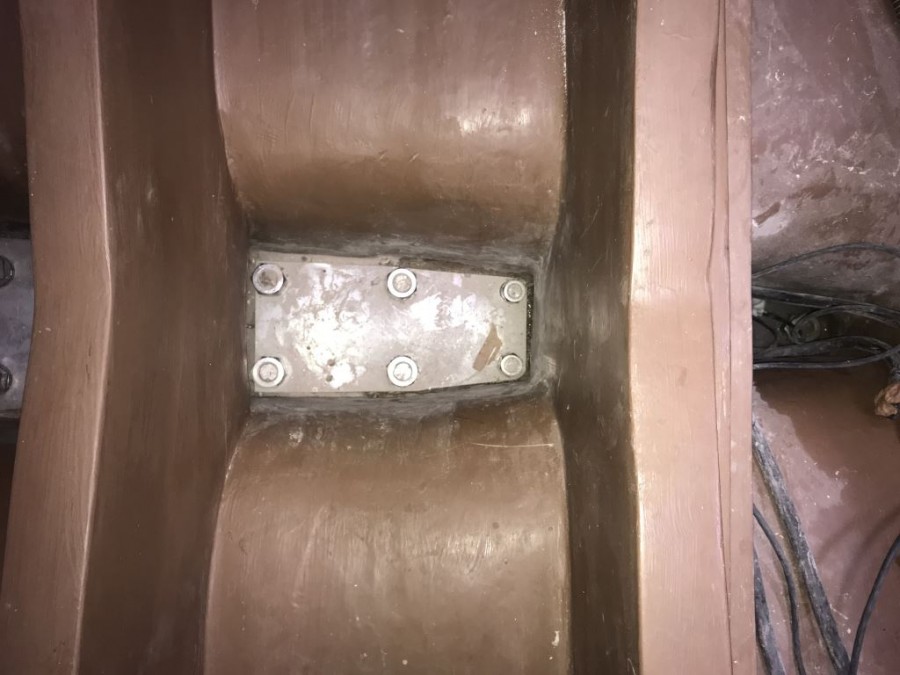 New plates installed 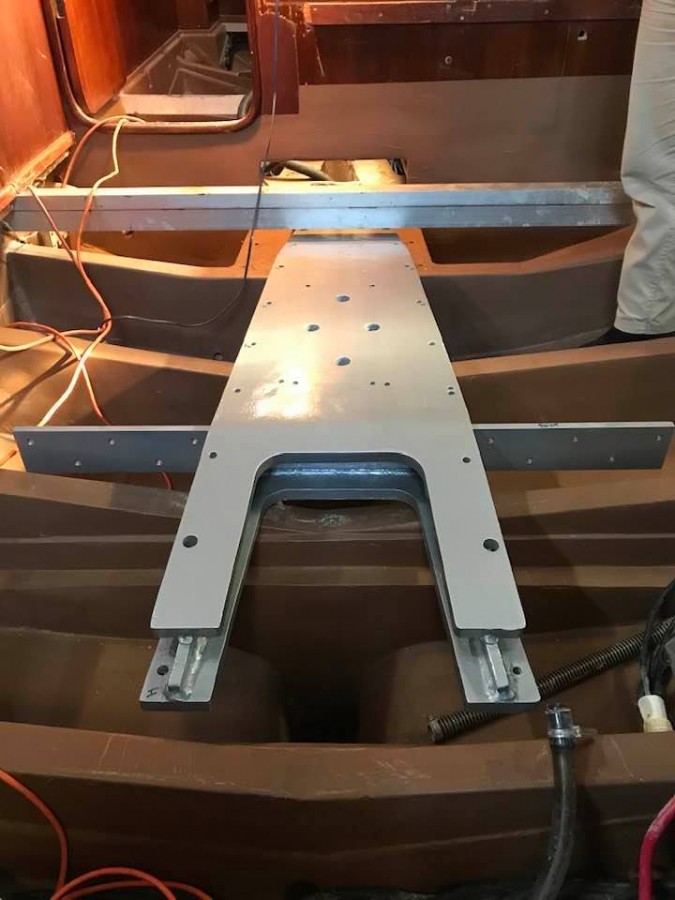 Reconditioned sub structure 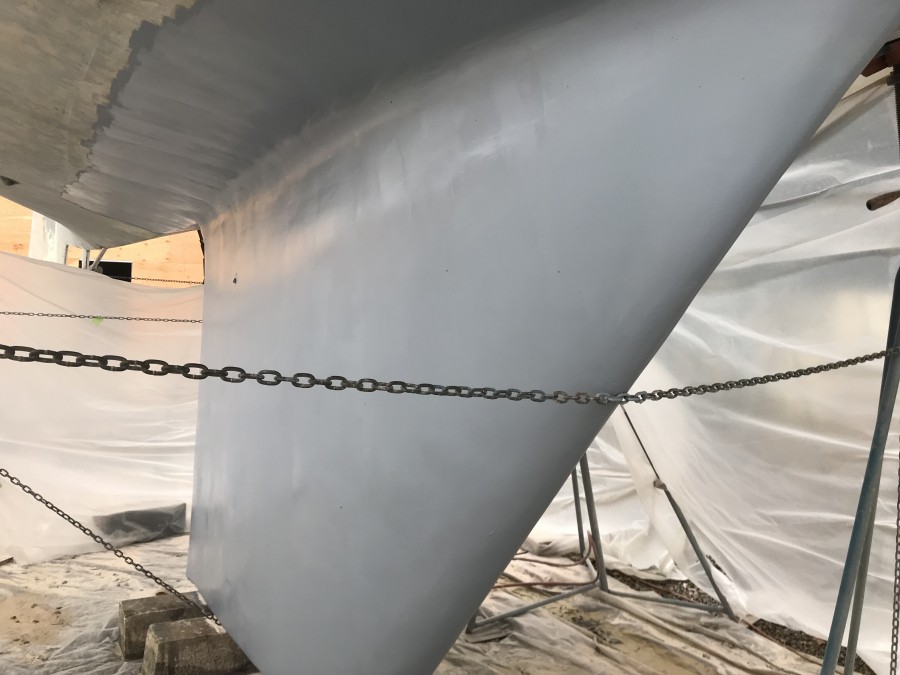 Finished |
|
Join Date: 01 May 2017
Posts: 16 |
||
|---|---|---|
|
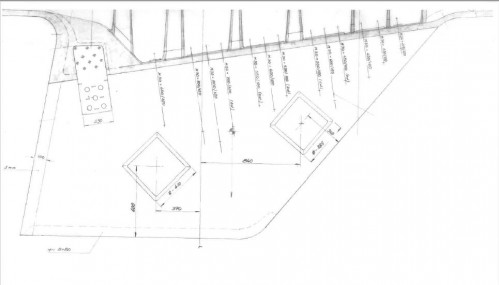
And finally, a sketch of the anticipated bolt pattern versus the as-built. Would also like to express our sincere thanks to Jamestown Boat Yard (JBY) for all their help and patience working on this project, particularly during the forensic investigation for the mystery bolts. 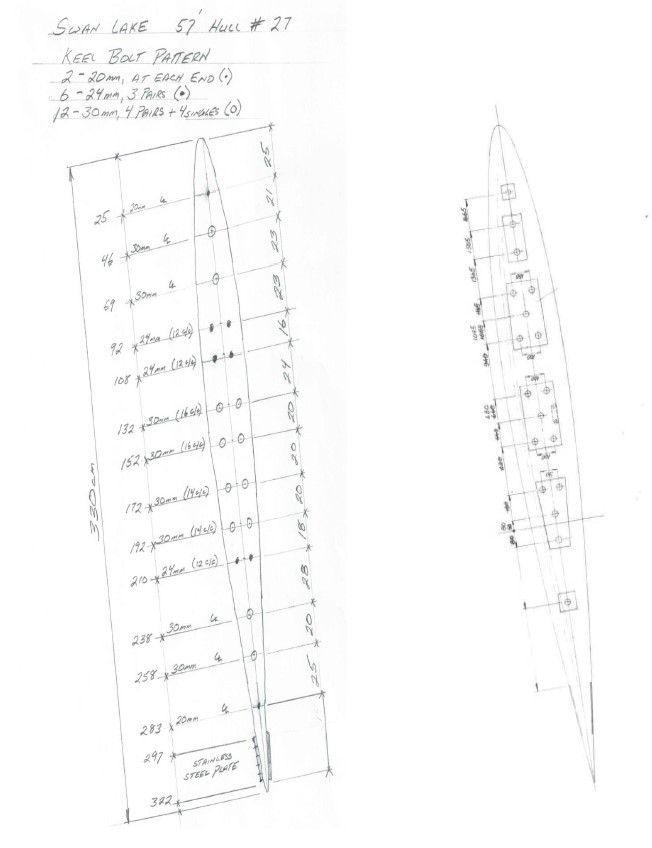 As built on left with the anticipated on the right 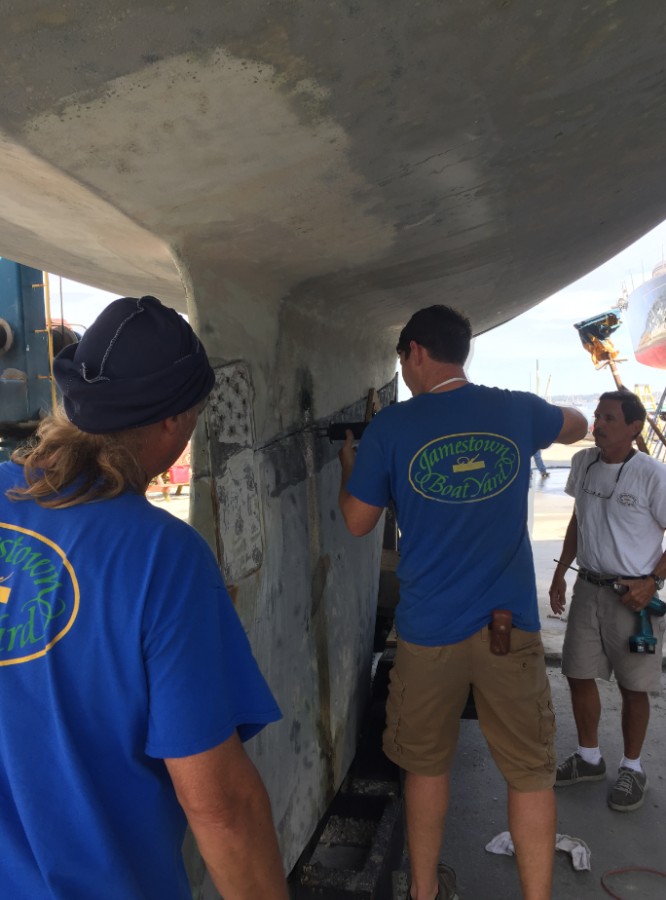 Bolt detection team |
|
Join Date: 01 May 2017
Posts: 16 |
||
|---|---|---|
|
Clarification. |
|
Join Date: 17 July 2020
Posts: 104 |
||
|---|---|---|
|
Good job ! exactly the same problem as 57 007, and delamination not found at begining too… hope you will enjoy soon your Swanlake on water !!! Yves Algol 57-007 |
- Threads : 1701
- Posts : 10215
- Members: 820
- Online Members: 0