Do you want to be informed on new Posts on this Thread? (members only)
| S&S Swan Maintenance - 411 head and basin foot pump inlet seacock |
|---|
|
Join Date: 16 May 2009
Posts: 252 |
||
|---|---|---|
|
411 head and basin foot pump inlet seacock |
|
Join Date: 16 May 2009
Posts: 252 |
||
|---|---|---|
|
Or maybe the hole was for a plug? I will check some of the others. A new Perko I saw had a plug... |
|
Join Date: 16 May 2009
Posts: 252 |
||
|---|---|---|
|
No plug�.just a hole. The boat is coming out of the water today�out of curiosity, can we still get the original seacocks, are they possibly in stock or still being made? |
|
Join Date: 27 January 2011
Posts: 140 |
||
|---|---|---|
|
Hi Geoff, I assume you also have the Blakes sea cocks - you can still get them, we had one replaced. Christian IF 411/028 |
|
Join Date: 16 May 2009
Posts: 252 |
||
|---|---|---|
|
Thanks Christian! |
|
Join Date: 16 May 2009
Posts: 252 |
||
|---|---|---|
|
So I have the Blake 3/4" coming Wednesday. It appears to me to be glasses in over a narrow channel that for some reason goes from starboard of center to just a little to port. If I do it myself I was going to cut it out carefully with a Dremel. Can anyone tell me what is connected under, metal or is it just glass? And what's the best way to get the old one out without destroying the conduit or surrounding structure? Professor?? |
|
Join Date: 02 January 2008
Posts: 1547 |
||
|---|---|---|
|
Geoff
|
|
Join Date: 16 May 2009
Posts: 252 |
||
|---|---|---|
|
Dear Lars -  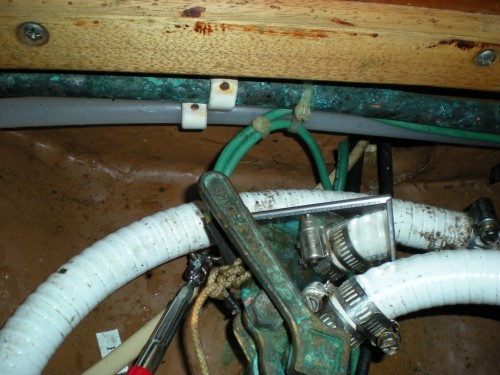 |
|
Join Date: 02 January 2008
Posts: 1547 |
||
|---|---|---|
|
Geoff
|
|
Join Date: 30 January 2007
Posts: 461 |
||
|---|---|---|
|
Geoff, |
|
Join Date: 16 May 2009
Posts: 252 |
||
|---|---|---|
|
Daniel - It only seems that way because there's a mirror in the shot I was using to see the hole, and there was more hose there than was needed, so there was a loop where there didn't really need to be one. Someone did branch into this line just beyond the seacock where the line goes under to get to the head, in order to feed a salt water wash down pump, which is still there and working, just with outlet now plugged. I may rig a hose for intermittent use, why not? But haven't as yet. As for the rest of my observations, I was just in error. The seacock is to the port side of center, and the small hole on that side was indeed the bottm of the Blake. Aside from my feeling foolish, that's all good, as it means there's no butcher repair job there letting water into the glass. Based on the condition of this one, I am going to replace all of them this fall. Check out the size of the hole in the old one! Thanks to everyone for all the help and Lars - I have asked about whether the sealant was still flexible, and hopefully will hear back shortly on that. All the best, soon to float - Geoff, Corazon, 411 #41 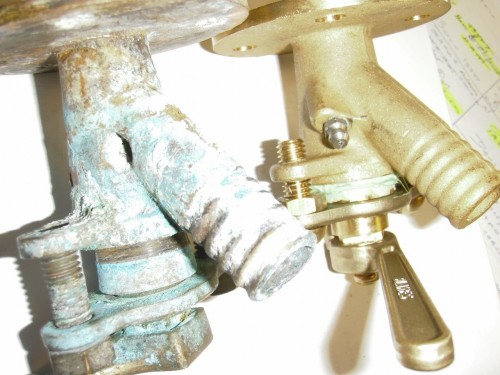 Old and new Blake head inlet seacocks |
|
Join Date: 06 September 2013
Posts: 53 |
||
|---|---|---|
|
Geoff,
|
|
Join Date: 30 January 2007
Posts: 461 |
||
|---|---|---|
|
Assuming that the boat is out of the water, the best way to exctract the cone from a stuck Blake seacock is by pushing it from outside with a properly sized rod. The rod, either hard wood or not-too-hard metal, should enter the inner part of the cone and act on the inner almost-flat part. My experience is that a more or less gentle blow with a mallet from outside will free any badly stuck Blake. |
|
Join Date: 06 September 2013
Posts: 53 |
||
|---|---|---|
|
Hi Daniel,
|
|
Join Date: 30 January 2007
Posts: 461 |
||
|---|---|---|
|
Hi Don, |
|
Join Date: 16 May 2009
Posts: 252 |
||
|---|---|---|
|
Don: |
|
Join Date: 06 September 2013
Posts: 53 |
||
|---|---|---|
|
Daniel,
|
|
Join Date: 06 September 2013
Posts: 53 |
||
|---|---|---|
|
You're right Geoff. Perhaps I'm lazy. Its a bear to work under the sink in the head. Plus the bronze looks great. The barrels on the other four seacocks are in good shape. They're not scored, so restoration should be a snap.
|
|
Join Date: 16 May 2009
Posts: 252 |
||
|---|---|---|
|
Don: It's interesting to see the subtle differences in the boats. My boat has the head inlet seacock under the floorboard outside the head, in the walkway to the forepeak (which is what put my thru hull hole on the port side). I assume yours is actually on starboard? Anyway, I can appreciate the big difference in working on mine in that nice open space, compared to messing around in tight quarters. The one thing about my spot was that only the Blake could have fit - any combination of more current offerings of thru hull fittings, valves, elbows etc. would have required more height than is available under that flooorboard (5" or so only, max.), so it was good the Blake was still out there, otherwise we'd have had to move it, plug the old hole, etc. I assume your boat like all our S&S Swans, has all these seacocks and other items electrically bonded? It's important to maintain the bonding, as any weak connection or degraded bonding straps can result in introduction of voltage potentials on the hardware, which in turn can result in unanticipated and often agressive galvanic corrosion of some items, bronze seacocks among them. What is your hull number (forgive me if it should be obvious, I can alway look again - - just curious). I ended up replacing (3), will do (2) more in the fall. The ones we did came out great, not that big a deal, and now we know they're new. Since Blake was selling only 3/4" and 1 1/2" now, we ended up wtih a larger than original engine inlet seacock, but that's fine. Best of luck, Geoff |
|
Join Date: 30 January 2007
Posts: 461 |
||
|---|---|---|
|
I think that Don is struggling with the large WC outlet seacock placed in all our 411 under the sink cabinet. |
|
Join Date: 16 May 2009
Posts: 252 |
||
|---|---|---|
|
Daniel - I am with you on the general topic of bonding/no bonding being an open issue, and one subject to discussion on both sides - my comments were directed to those of us with bonding all over, where some bonding might be compromised - in these cases, the compromised item can move in voltage from the rest of the chain and become a super anode to the other bonded items.....so I was told in any event, and it made engineering sense to me. For whatever it's worth - of course, I would love to hear what the professor thinks on that topic... All the best, and fair winds - Geoff |
- Threads : 1701
- Posts : 10215
- Members: 820
- Online Members: 1